
Setting Up Your Tailwind CSS Project
In this blog post, we will be learning all that we need to get started with Tailwind CSS.


Table of contents
- Introduction to Tailwind
- Step-by-Step Guide To Set Up Your Tailwind Project
- Step 1: Create a new folder
- Step 2: Set up an npm package
- Step 3: Installing Tailwind CSS using npm
- Step 4: Creating the tailwind.config.js File
- Step 5: Configure your template paths
- Step 6: Creating CSS Files
- Step 7: Setting up input.css file
- Step 8: Add scripts to package.json file
- Step 9: Run command to build CSS
- Step 10: Add the output.css file in your templates
- Step 11: Practise Setting Up
- Conclusion
If you are new to Tailwind CSS, setting up your first Tailwind Project may be hard and confusing for most. Many give up learning this beautiful framework simply because they are doing some silly mistakes or they don't understand the meaning and the purpose of each step involved in it.
In this blog, we will be looking at how you can set up your first Tailwind project easily and also explaining you the purpose and logic behind each step.
First Let's see what is Tailwind and How does it work. Understanding this is important otherwise setting up your Tailwind Projects will be just typing empty commands without understanding what is happening BTS. So Let's Get Started!
Introduction to Tailwind
Tailwind CSS is a CSS framework that focuses on utility-first styles, meaning that it provides low-level styling for individual HTML elements, rather than predefined styles for larger page components(that happens in BootStrap). It is designed to be used as a way to build efficient and consistent user interfaces quickly, and it can be customized to fit the specific needs of a project.
To use Tailwind CSS, you need to link Tailwind's CSS file to your HTML file in the project (Just like how you link your vanilla CSS code file to your HTML file), and then use the provided class names to apply styles to your HTML elements. Tailwind CSS provides a wide range of utility classes that can be combined to style elements in a flexible and modular way. For example, you might use the font-bold class to make text bold, the bg-green-500 class to give an element a green background color.
If we want to create a Div HTML Element, You will have to think in terms of what properties should this div have like What will be it's width, height, background color, text color and so on.
Suppose we want to create a div and a button with the following properties:
Div:
Background color - Red
Text Color - White
Button:
Background color - Violet
Text Color - White
Width and Height - 100px both and
Let's also make it rounded!
This will be the HTML code for it:
<div class="bg-red-500 text-white">This is a div with red background and white text</div>

<button class="bg-violet-500 text-white font-bold rounded w-[100px] h-[50px]">Button</button>
The result will look like this:

Here we see, that just like in our Vanilla CSS, we define styling properties of a class and add that class to our HTML Elements, we do this exact same thing in Tailwind.
Here one thing needs to be understood:
How does Tailwind Work?
Tailwind CSS is organized into a series of layers, each of which provides a set of utility classes for styling specific types of elements or design patterns.
For example, there is a layer called - base layer, which provides a set of utility classes for styling basic HTML elements, such as headings, paragraphs, and lists.
The components layer provides a set of utility classes for styling common UI elements, such as buttons, forms, and tables. And the utilities layer provides a set of utility classes for applying low-level styling, such as margins, padding, and colors.
From reading the above lines, it seems that we would need all these layers in our Projects.
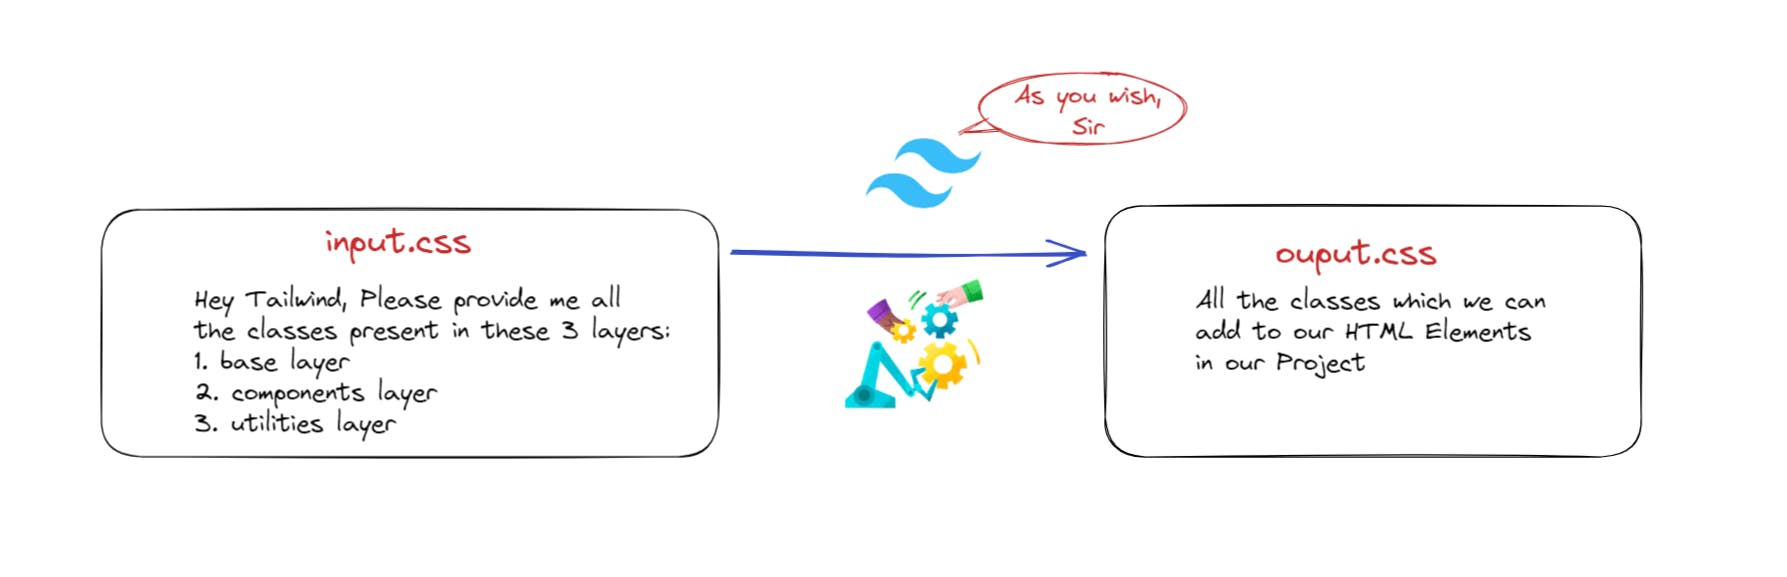
So we need to tell Tailwind that - "Hey Tailwind, We will need all the classes present in these layers", But how do we do that?
We will be making a file called the input.css file in which we will write some code to convey this message to Tailwind and by running some commands we will process this input.css file to obtain all the classes present in these layers in a new file called output.css. Here is a visual representation for better understanding:
So now as we have a firm understanding of What Tailwind is and how it works, let's walk along step-by-step setting up your Tailwind CSS Project.
Step-by-Step Guide To Set Up Your Tailwind Project
Follow along with me:
Step 1: Create a new folder
Create a new directory and open it in your favorite text editor, for me it's VS Code.
Step 2: Set up an npm package
Open up the Terminal and type in the following command to set up an npm package:
npm init --yes
Step 3: Installing Tailwind CSS using npm
Install Tailwind to use it in your project.
npm install -D tailwindcss
Step 4: Creating the tailwind.config.js File
Type this command to create a tailwind.config.js file:
npx tailwindcss init
What is this file and why do we need it?
The tailwind.config.js file is the configuration file for the Tailwind CSS framework. It allows you to customize the default styles and design of your project by defining your own CSS classes and styles, as well as overriding the default styles provided by Tailwind.
By customizing the tailwind.config.js file, you can easily apply your own design styles and preferences to your project.
This file is also important as here you will be specifying/ telling Tailwind where it will look for its classes. Let us see it in the next step.
Step 5: Configure your template paths
It is important for Tailwind to know that in which files it has to look for it's classes. Lets say, we only have the index.html file in which we want to add Tailwind classes so we will have to mention the path of the HTML file in the form of a String in the content array in the tailwind.config.js file. We will do it like this:
/** @type {import('tailwindcss').Config} */
module.exports = {
  content: ["index.html"], // Add the paths here!
  theme: {
    extend: {},
  },
  plugins: [],
}
Suppose our index.html file was in src folder, So the content array will look like this:
content: ["./src/index.html"],
You probably got the idea.
Like this You can go about mentioning all the paths of the files in which you intend to use Tailwind CSS.
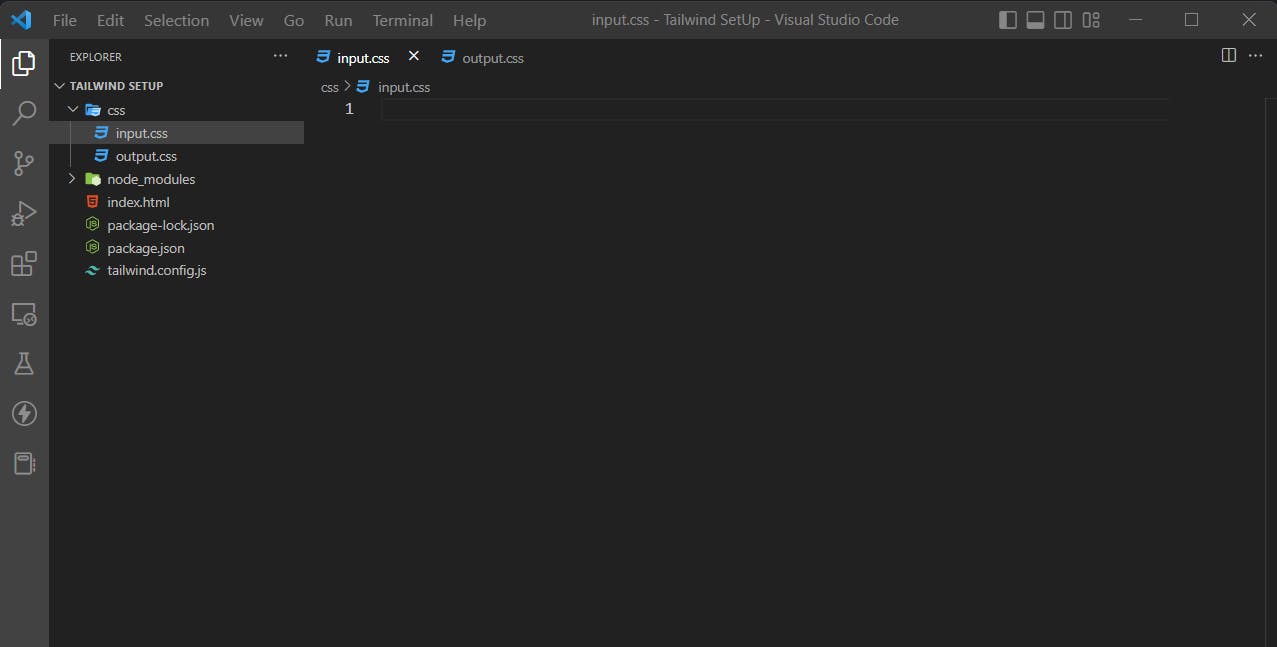
Step 6: Creating CSS Files
Let's create a CSS Folder with 2 files: input.css and output.css.
At this point, this is how my file structure in VS Code looks like, Yours will also look something like this:
Step 7: Setting up input.css file
Add the following code to your input.css file:
@tailwind base;
@tailwind components;
@tailwind utilities;
With the above code, we instruct Tailwind to add the classes present in the base, components and utilities layer using the @tailwind directives.
Now, we will process this input.css file to extract all the classes present in this layer to our output.css file.
Step 8: Add scripts to package.json file
In the package.json file, you will see a scripts object which looks like this:
"scripts": {
    "test": "echo \"Error: no test specified\" && exit 1"
  },
Inside this scripts object, we will add 1 test called build:css
"scripts": {
    "build:css": "npx tailwindcss -i ./css/input.css -o ./css/output.css --watch"
  },
Let us understand the meaning of the following command:
npx tailwindcss -i ./css/input.css -o ./css/output.css --watch
Explanation:
The -i flag specifies the input file, which is the CSS file that you want to process with Tailwind CSS. In this case, the input file is located at ./css/input.css.
The -o flag specifies the output file, which is the file that will be generated after the input file has been processed by Tailwind CSS. In this case, the output file will be located at ./css/output.css.
The --watch flag tells Tailwind CSS to watch the input file for changes, and rebuild the output file whenever the input file is modified. This allows you to make changes to the input file and see the resulting changes in the output file in real-time.
Overall, this command is used to build and process a CSS file using Tailwind CSS, and to watch the input file for changes so that the output file can be updated automatically as you work.
We could have ran this command directly in the terminal but instead we choose to give this command a short name of "
build:css" by doing the above changes in our package.json file.
Step 9: Run command to build CSS
Now, Run the build:test command like this:
npm run build:css
Step 10: Add the output.css file in your templates
Now, We just need to link the ./src/output.css file to our index.html file and we are done! You can do it like this:
<link rel="stylesheet" href="./css/output.css">
Remember: You need to attach the
output.cssfile and NOT theinput.cssfile.
Step 11: Practise Setting Up
Our Tailwind Project is all set and now you can write Tailwind CSS easily.
I know, if you are a beginner and you are setting up Tailwind for the first time, it may seem pretty overwhelming, but you should not give up on learning it just because you can't set it up.
Your next step is to make a separate folder and practise setting up a Tailwind project again by following the above-mentioned steps to get hold of the entire process.
Conclusion
With this, we come to the end of this blog, Like the blog if you learned something useful and subscribe to the newsletter for more such blogs.
About Me: I am a high school student currently learning about Web Development and making an attempt to share my learning in public.
If you are interested in hiring me for Technical Writing, Contact me here:
Email: krishvp4856@gmail.com Twitter: @Krish4856 GitHub: @KrishJ4856