
Learn Standard Linux Streams and File Manipulation
In the second part of the Linux In One Go Series we will learn about Standard Linux Streams and some important File Manipulation concepts.


Hello folks, I welcome you all to the second blog of the - Linux In One Go Series.
In this part, we will be learning about the Input Stream (stdin) and the 2 output streams (stdout and stderr) in Linux. We will also learn about the important Pipe ( | ) operator, ENV variables, PATH and some important file manipulation commands like sort, wc (Word count), tr (Translate), uniq (Unique) and much more. So Let's Get Started!
Standard Streams in Linux
Let's understand what is stream in Linux!
A Stream is a way of transferring textual data. Say when we type in thels command in the console, There is a stream called stdin or The Standard Input Stream which takes the command we typed in to the Linux Kernel. The Kernel, which is the very core of any O/S, then processes it and executes the command. If the command got successfully executed, the Kernel then sends the output/result to the Linux Terminal through a stream called stdout (The Standard Output Stream). In case any error occurs while running the command, (suppose we typed in lq instead of ls) The Linux Kernel then sends the error statement to the console screen( in this case, lg: command not found) through a stream called stderr (The Standard Error Stream).
It's like this:
- You want something that the Kernel should do!
- You provide type in the command in the Terminal
- The Linux Kernal is sitting in a faraway place, so to carry these command to it, we need stdin.
- The Kernel runs the command and sends the output to the console through the stdout / stderr stream.

As you can see in the above image, These are the 3 Standard Streams in Linux and they are also given some code numbers and they are represented by a symbol:
1. stdin - Code Number 0; Symbol - < [Less Than Sign]
2. stdout - Code Number 1; Symbol - \> [Greater Than Sign]
3. stderr - Code Number 2; Symbol - 2> ['2' before Less Than Sign]
By default, stdin takes input from the console but it can also take input from a file.
We rarely encounter a case where this happens!
Similarly, By default the stdout and stderr gives their output/error to the Terminal, hence we can see them. But they can also transport the output/error to a file also!
For example, check the images below:
This is the normal scenario when the result is delivered to the Terminal

To deliver the result to a file, we need to do the following:
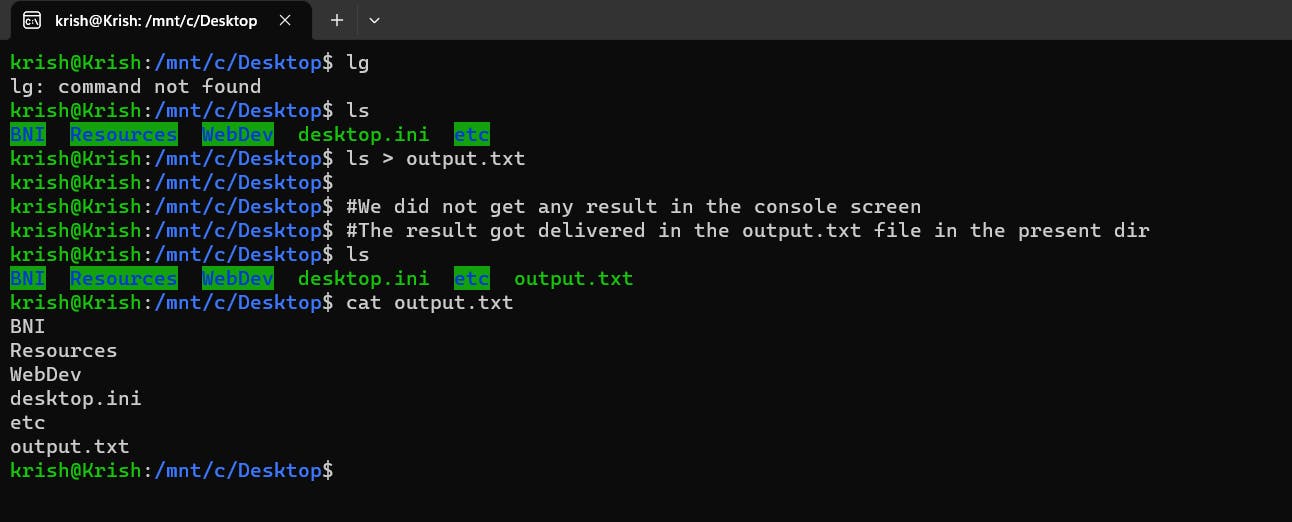
The > operator is a redirection operator which is used to redirect the output of a command to a file. In this case, output.txt is the file that the output of the ls command will be redirected to.
So, the command ls > output.txt will list all the files and directories in the current working directory and redirect that output to a file called output.txt. This will create a new file called output.txt if it does not already exist, or overwrite the contents of the file if it does exist.
To deliver an error to the file, we do something like this:
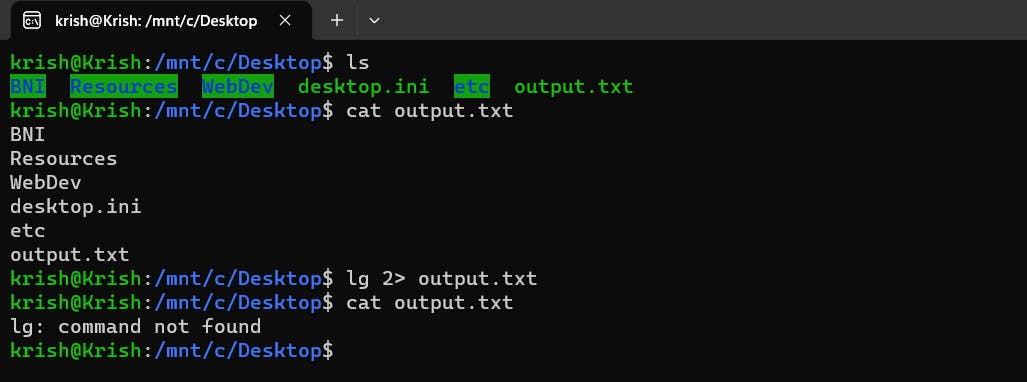
Notice that the 2> symbol which was associated to the standard error stream (stderr) actually redirected the error statement to the output.txt file, because of which 2 things happened:
1. The error lg: command not found did not appear in the console, it was printed in the output.txt file.
2. The previous content of the output.txt file got erased completely or we can also say that the new content overwrites the previous content. In order to prevent this from happening, we need to use >> instead of > to append the output to the end of the file and 2>>> instead of 2> to append the error to the end of the file without deleting the original content like it is displayed in the below image!

The commands are to be noted here. A quiz for you, What will be the result of the following command and where will it be displayed? lg >> output.txt
If you guessed that it would result in an error message and that error will be appended in the output.txt file, You are wrong!!
Remember that >> only redirects outputs and appends it to the file passed but It does not redirect the errors. The errors by default will be printed in the console itself!
Hence the correct output will be:

There is a way where you can actually nullify these errors. There exists a file in the system in the following path: cd /dev/null. Check the highlighted one in the image below.

Here 2> redirects the error to a special file - /dev/null. This is a special file in Unix/Linux that discards any data written to it and produces no output. In this way the error is neither displayed in the console nor is it logged in a file.
'Less' command in Linux
Let's do something in order to understand this command. Go to this site: https://www.lipsum.com/ and type in 1000 in the input box, select words and click on Generate Lorem Ipsum button like this:

After this copy the 1000 words lorem-ipsum text.
Now go to the terminal and type in:
1. touch output.txt: We create a new file called output.txt
2. vi output.txt: Open the file using vim text editor
3. Press i to Enter Insert Mode and Paste the copied text
4. Press esc key to exit the Insert mode and enter the Command mode
5. Enter :wq to write and save the file.
To know more about the Vim Text Editor in Linux, Check out my Twitter Thread on it!
After this type in cat output.txt to view the entire content of the file. Note that, in the case when the content of the file is really really huge, once you cat in it, you entire terminal will be overcrowded and will be messy. The only way to get out of this messy terminal is the clear command.
There also exists a way where you can view the contents of a huge file but also not make the console crowded, which is by using the less command. Here, just type in less output.txt and check what happens!
A new screen opens up where the contents of the file is displayed and you can exit this screen by typing in q.
Using the less command gives you a way to open up a file in a different screen altogether. You can view the contents of the file and once you are done, just press q to exit out of the screen. In this way your original console screen will not get affected.
It is to be noted here that less command only works for files and not for directories.
Pipe operator ( | )
You can use the Pipe operator by typing: Shift + \ (Backward Slash).
The Pipe operator allows you to collect the stdout (output) of one command and feed it as stdin (input) to another command.
Suppose, you were to look inside a big directory using the ls command, like /usr/bin, it would simply overcrowd your console like this:

It would be much better if we could also view the contents of a folder with the less command so that our console does not get messy. But as you know, the less command cannot display the contents of a folder. It can only display the contents of a file.
But there exists a way, where we can leverage the functionality of the Pipe operator | to our advantage here:
Have a look at this command and guess what are we trying to do here using the information of the Pipe operator above!

If you notice closely the right hand side of the Pipe operator ( | ), the ls /usr/bin command is taken by stdin to the Linux Kernel for it to execute, once the command is executed and the result (i.e, the full list of the files and folders inside the /usr/bin directory) is passed through the stdout command. This output is collected by the Pipe operator and is feeded as an input to the less command and it works now!!!
This time less lists the result of the ls /usr/bin command into a new screen. You can navigate through the screen using the down and the up arrow keys and press q to exit out of the screen anytime!
Environment Variables
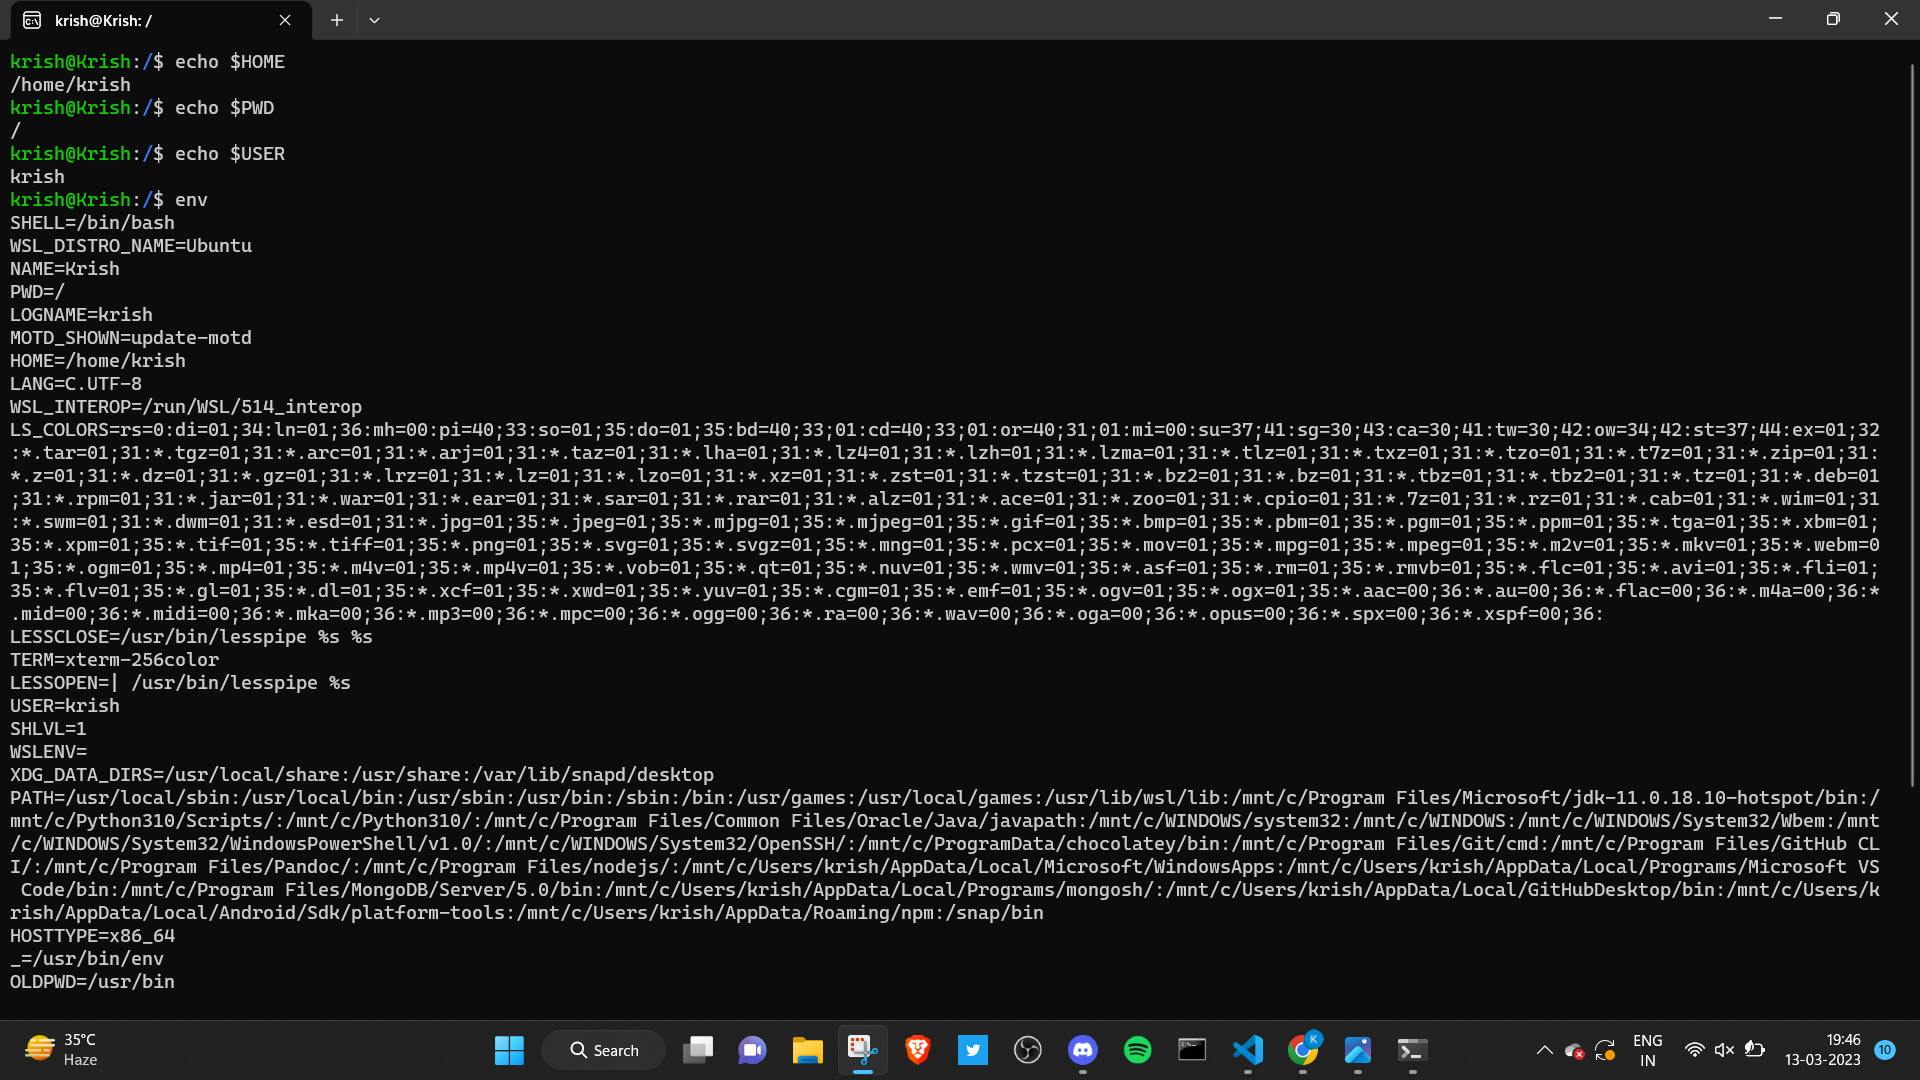
Environment variables are variables which store and provide useful information which is used by shells. For example, just type in echo $HOME in your Terminal and you will see the path of the home directory in your system. If you type echo $PATH, this will give you the Absolute path of the directory you are currently inside. On typing $USER, it gives you the username of your O/S.
So this, $PWD, $USER, $HOME and many others are basically variables which are stored in the system. You can find all the environment variables by simply typing env in the terminal.
The value of the variables also keep on changing. Just think about this - How does the pwd command give you the path of the present working directory?
The simple answer for this is that it keeps a track of the current directory we are inside using the $PATH env variable. Whenever we cd into another directory, the value of the $PWD variable get's updated. The pwd command uses this environment variable to show us the needed output.

One important env variable is called $PATH. The PATH variable stores all the paths that your system will search once it is given a command to execute. As you see the image below, The $PATH env variable stores a bunch of paths separated by a colon (:)
Let's jump into the /usr/bin directory which is one of the many paths mentioned in the $PATH variable.

If you ls into this directory and look closely, you will find many commands which we learnt previously are present here in the form of files! Thus when we say that Everything in Linux is a File, we mean it! Even the commands we type in are a file.

Suppose you enter the command ls, the Kernel will search in all the paths as mentioned in the $PATH env variable. Once it finds the file name related to the name of the command (which it will find in the /usr/bin directory itself), it then executes the command and returns the result.
Suppose you entered lg instead of ls, The file named lg will be searched in all the individual paths contained in the $PATH env variable separated by colon. On not finding any file name similar to the command name, it will simply give an error called: command not found!
File Manipulation Commands
Before we begin with this section, I want you to complete a simple file setup along with me. The setup process goes like this:
1. First just do ls and check if there exists a file named output.txt. If it exists, remove it by doing a rm output.txt.
2. The next step is to create a file called animals.txt using this command:touch animals.txt.
3. Using the Vi Text Editor, Open the file (vi animals.txt) > Go to insert mode (press i) and paste in the following data in the file:
cat
dog
lion
tiger
tiger
tiger
elephant
tiger
bear
wolf
sheep
fish
4. Now, exit out of the Insert Mode (press esc) and then enter :wq which will save the file. Alright, we have done the file setup and ready to explore some file manipulation commands!
head: The first command on our list is theheadcommand. It's function is to provide the first 10 lines of the file provided to it.
head animals.txtwill print the first 10 lines of the file in the console screen: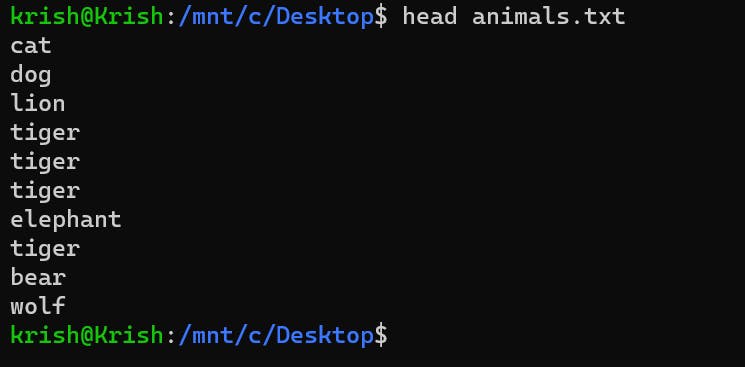
You can use the
-nflag with this where we specify the number of lines we want theheadcommand to show us. Something like this:head -n 5 animals.txt: This command shows us the first 5 lines of the file.head -n 13 animals.txt: This command shows us the first 13 lines of the file.
tail: This command is similar to theheadcommand with just one difference that thetail animals.txtcommand will display the last 10 lines of theanimals.txtfile.
You can use the-nflag with this command like we used with the previous command.
sort: This command does what it's name is, Yes it will sort the contents of the file you provide to it.sort animals.txtsort the items in the file in ascending order.
You can use the-rflag here to reverse sort it (i.e, sorting in descending order) like this:sort -r animals.txt.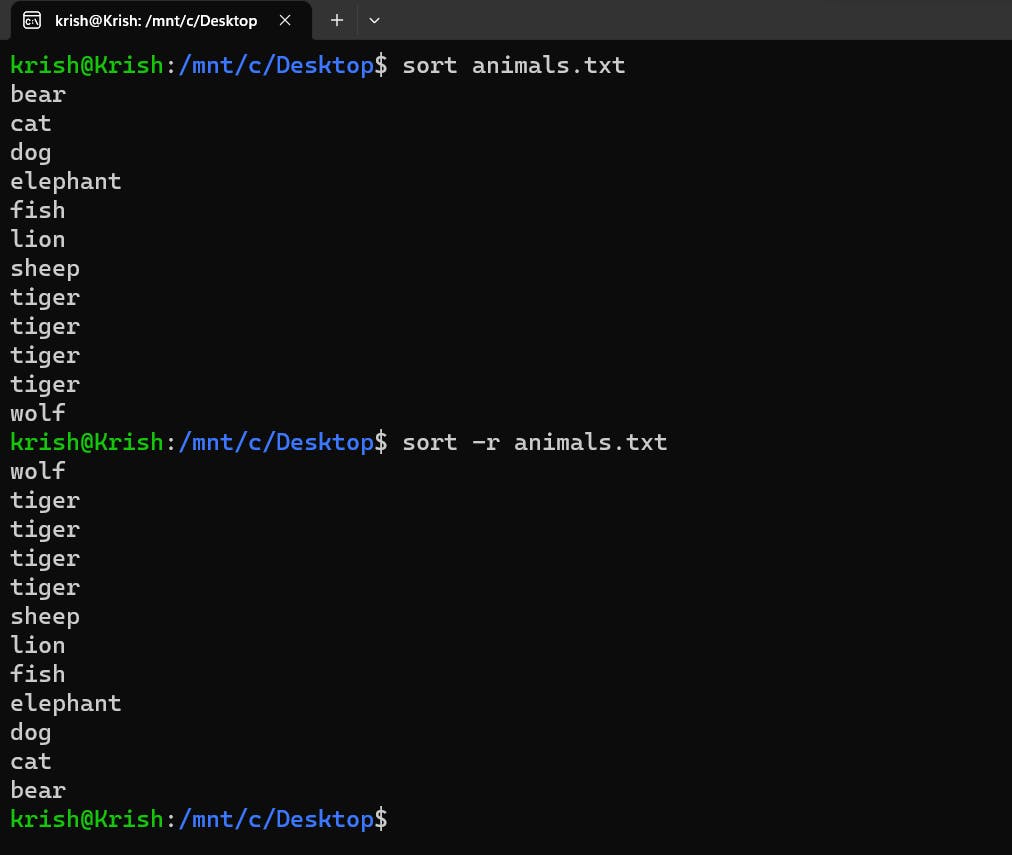
It is to be noted here that the original contents of the file will still not be changed as it prints the sorted values in the console and does not save it in the file. In order to do that, we will have to do something like this:
 sort animals.txt > sorted_animals.txt
 mv sorted_animals.txt animals.txt
What these 2 command will do is:
-sort animals.txt > sorted_animals.txtcommand will sort the animals.txt file and store it in a temporary file calledsorted_animals.txt
-mv sorted_animals.txt animals.txtcommand will overwrite the original fileanimals.txtwith the sorted content from the temporary file. The temporary file is then deleted from the File System.If you think you can do it this way:
sort animals.txt > animals.txt, It will not!!
Because this command does not work the way you think it should.
Basically what happens during the execution of this command is:
- Firstly, theanimals.txtfile is opened
- Next, The>operator deletes all the previous content of the file
- Next,sort animals.txtis instructed to sort an empty file as all it's content has been deleted in the previous command and thus it sorts nothing and logs nothing into the file!In a gist, first the
>operator opens theanimals.txtfile and deletes all the data stored in it and then everything else happens after this step.
If you think about this command:sort animals.txt >> animals.txtThis command will certainly work but the problem is that it appends the sorted items to the end of theanimals.txtfile which already contains the unsorted data as a result you will have both the unsorted as well as the sorted data in the file.tr: Thetrcommand stands for translate. It basically is used to translate the Lowercase alphabets to Uppercase or vice-versa. There are other use cases to it but in this blog we will understand just this one. It's syntax is:tr a-z A-zwhich means "translate all characters froma-ztoA-Z".
It is to be noted that this command does not take any file path as an argument so doing something like this simply won't work out:tr a-z A-Z animals.txt. It takes in pure text as input, so you would have to do something like this:
cat animals.txt | tr a-z A-Z. Here the text output of thecatcommand is fed as input to thetrcommand. Thetrcommand translates the textual data to UpperCase and prints in the console, like this: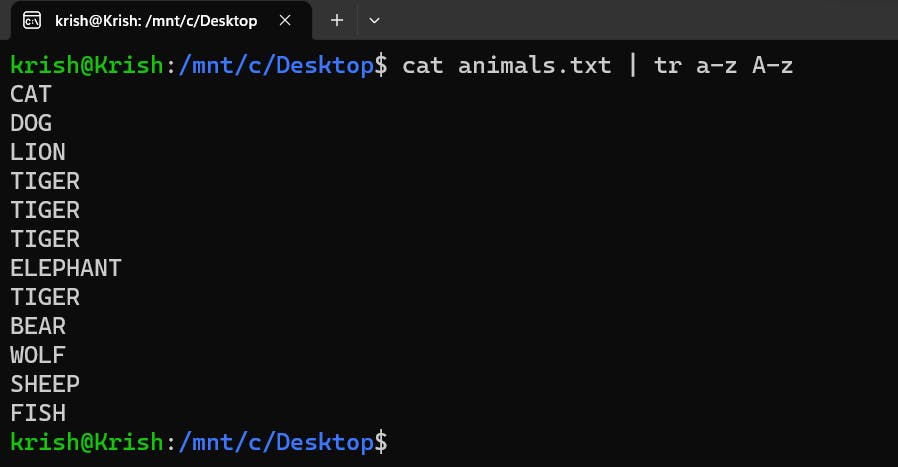
uniq: Theuniqcommand discards all the duplicate entries of the items in the files. It can be used to filter out repeated lines adjacent to each other and display only unique lines of text.
As you can see in the above image, we have just one item - tiger which is repeated multiple times in the original file. You need to notice here that it only removes the duplicate entries of tiger which are adjacent to each other which means it keeps the first tiger in the output, removes the other 2 tigers adjacent to it but is unable to detech the 4th tiger which comes after elephant.
A simple way to solve this problem is to first
sortthe file, which will cause all the 4 lions to occur one after the other and then using theuniqcommand to delete all the duplicate enteries, Like this:
Let's remove the 4th tiger from the file to avoid further issues with that!
Now our file looks like this:
There are a few flags which can be used with
uniqcommand such as:cflag - This flag tells the number of occurrences of the each item in the file
uflag: This command displays only those items with single occurrences. If it encounters any item which occurs more than once in the file, it simply discards it and does not show it in the final output. Like the 3 tiger which occur adjacent to each other got completely deleted but other items are included because they occur just once!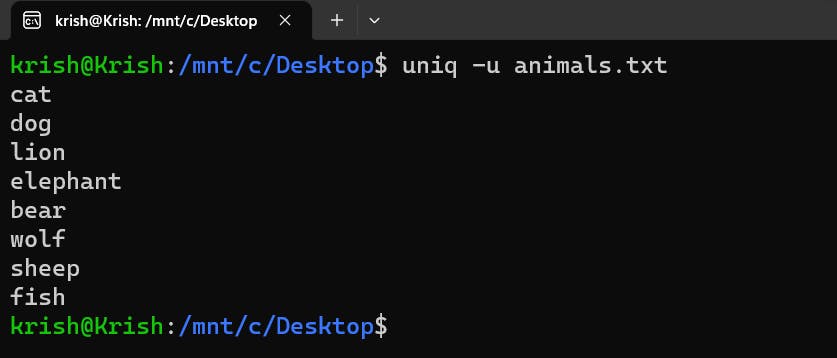
dflag: Thedflag is just opposite to theuflag. It basically displays only those items which occurred more than once. If any item occurred only once, it will discard it completely from the final output. In our example, this command only displays tiger which occurred 3 times and discarded all others which occurred just once!
wc: Thewccommand stands for word count but does more than just counting the number of words.The
wc -lcommand tells us the number of lines in a fileThe
wc -wcommand tells us the number of words in a file andThe
wc -ccommand tells us the size of the entire file in terms of bytes

The normal wc command without any flags is a short hand for the above mentioned commands. In the above image, in the output of the wc animals.txt command:
- The first 11 represents the number of lines
- The second 11 represents the number of words
- The third number (i.e, 61 ) represents the size of the file in terms of bytes!
grep: The grep command allows you to search textual data for characters. It can be used just like the search you do for the files and directories using the Windows Search Bar or the Search bar in the File Explorer or the Search operation you perform on PDF's - looking for occurrences of specific words or characters in it.
As shown in the below image, I create some folders called: WebFlow, Web2 and Web3 using the mkdir command and then perform an ls operation in my Desktop directory which provides me with a output in the form of textual data and then I feed it to grep to search for the word - Web in the textual data provided to it.

It is to be remembered that grep can only search for characters and words in a textual data only. If you ask it to search for some files or folders inside a directory, it will give an error. You can use the find command for that purpose!
Conclusion
With this we come to the end of the blog. I want to give you a Huge Congratulations to you for staying till the very end to learn! I hope you had fun reading the blog and remember that this is not the end. There are a lot more Linux concepts left to cover and we will be doing that in the next blogs which will be rolling out very soon. Follow me to get notified when the other blogs of the series - Linux In One Go come out.
A brief introduction about myself: I am Krish, A Highschooler who is currently learning web development and trying to share my learnings in public through Twitter threads and Blogs on Hashnode. I am currently learning React and building some projects around it. This is my Twitter Handle, Do connect with me there, DM's are always open! Twitter: Krish4856