Learn Linux System Administration
In this blog, we will learn about User Management and Permissions in Linux.


Hello folks, I welcome you to the third part of the Linux In One Go Series in which we will be understanding different concepts in Linux like:
Users,
Groups,
Passwords,
Types of permissions of a file/folder
and some of the commands associated with it.
If you have read the previous blogs of the series, you would know that it followed more of a practical approach, but this one will focus more on the theoretical part of Linux which you should also know. With this, Let's Get Started with this blog!
Users In Linux
A user is just an account created in the system and has some access to the system resources (You can think of it as creating an account on Amazon). The system provides the user with a username, a password and a unique id to every user called user id (uid) which is used by the system to identify that particular user.

For example, I have a user account created in the Operating System running on my machine. Let's understand the above image in detail:
krishis theusernameof my user (meaning that I am currently logged in as user with the name -krish)Krishis the hostname of the system I am currently logged into (meaning that the name of my machine isKrish)@separates username from hostname~is the path to my home directory:separates the hostname from the current directory$is the symbol in Linux indicating that the shell is ready to accept the commands
If you open up your terminal, you will get a similar thing to see. As mentioned above - A user is just like an account created on Amazon, but instead of it being on Amazon's server, A user is an account created in your system!
You will be a little surprised to know that there are multiple other "users" operating in your system (Other than you!) which you probably don't know about.
Multiple users are operating in your system for different purposes, To name one:
There are some accounts on your system called system daemons (not demons! 😅). These users are the ones who make sure that the Processes run smoothly in your system.
Small Intro of Processes:
A Process is basically, a task which your computer is performing.
For example: You can easily browse something on the Internet (Task 1) along with listening to music (Task 2) at the same time because 2 different processes are handling these individual tasks. (We will learn about processes in the next blog!)
Your laptop itself has a lot of user accounts within itself and each user is handling something in the background for you to keep the system up and running.
There is a file that contains a list of all the users present in your system. To have a look into it, just type in: cat /etc/passwd.
Have a look at the below image to check out all the users present in my system.

Root User - The Most Powerful User
Amongst all the users operating in your system (including you), The Root user has maximum power in terms of the level of access he has over the system resources as well as the actions he can perform in the system compared to other users.
The Root user is the most powerful user account on the system. It has complete control over the system and has access to all files and directories. He can perform any action in the system including installing and removing software, modifying system settings, accessing all files and directories and managing other accounts.
As you saw in the above image, the /etc/passwd file contains some "gibberish looking" information about all the users present in the system.
Let's study the root user's information in detail to what the hell it was! And from there we can infer other user's information:
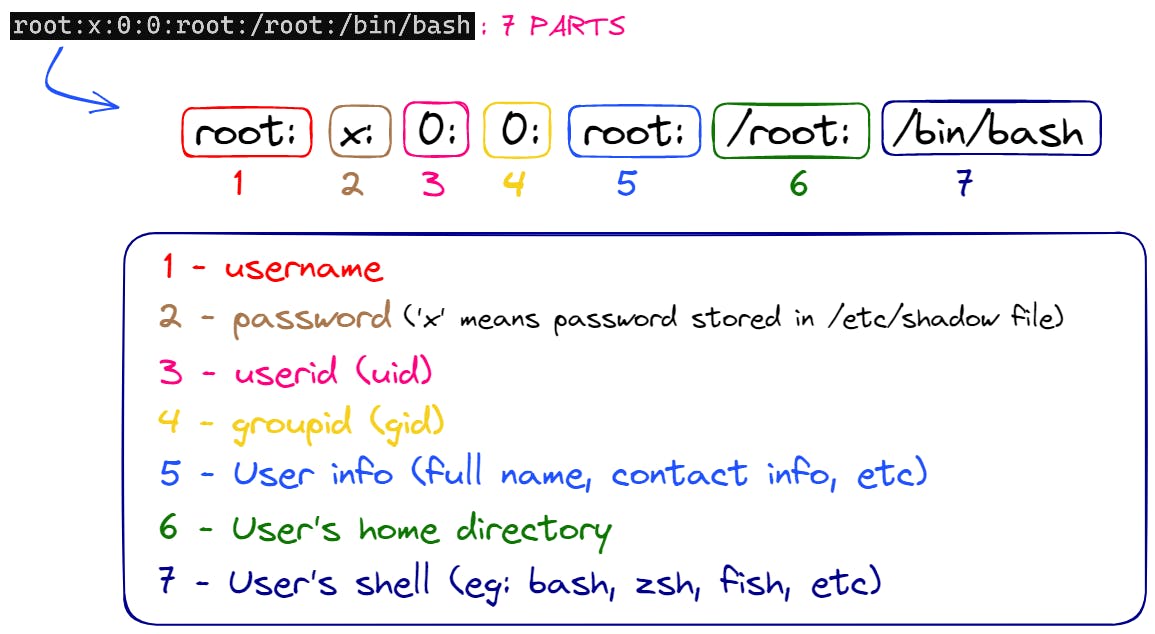
The above image breaks down the root user's information which was kept in etc/passwd file. As we see, Just like the root user, every user's information has 7 parts which are separated by a colon (:). Let's understand what each part means:
Part 1:
root- This is the username of the userPart 2:
x- This is the password of the user. If you see anxwritten here, it means that the password for the user is safely stored in the/etc/shadowfile.
(We will also study this file in detail shortly!)Part 3:
0- This is the userid (uid) of the user (A unique number associated with each user present in the system). In all systems, therootuser has auidof 0 (zero)Part 4:
0- This is the id of the group the user is a part of.
In Linux, A group is a collection of user accounts that share common permissions on the system. Just like users, everygrouppresent in the system has a unique id which is called thegroupidorgid.Part 5:
root- This is the full name of the user's account.Part 6:
/root- This is the path to thehomedirectory of the user.Part 7:
/bin/bash- This is the default shell for therootuser.
A Shell is the program that provides the CLI for the user to interact with the operating system. It could bebashorzshorfish
Wearing Root's Crown!
To understand the heading of this section , we need to go through a certain process:
Till now we have understood the concept of users, groups and also what that "gibberish looking" user information meant! But still there is one missing piece in the user information,i.e, the user password.
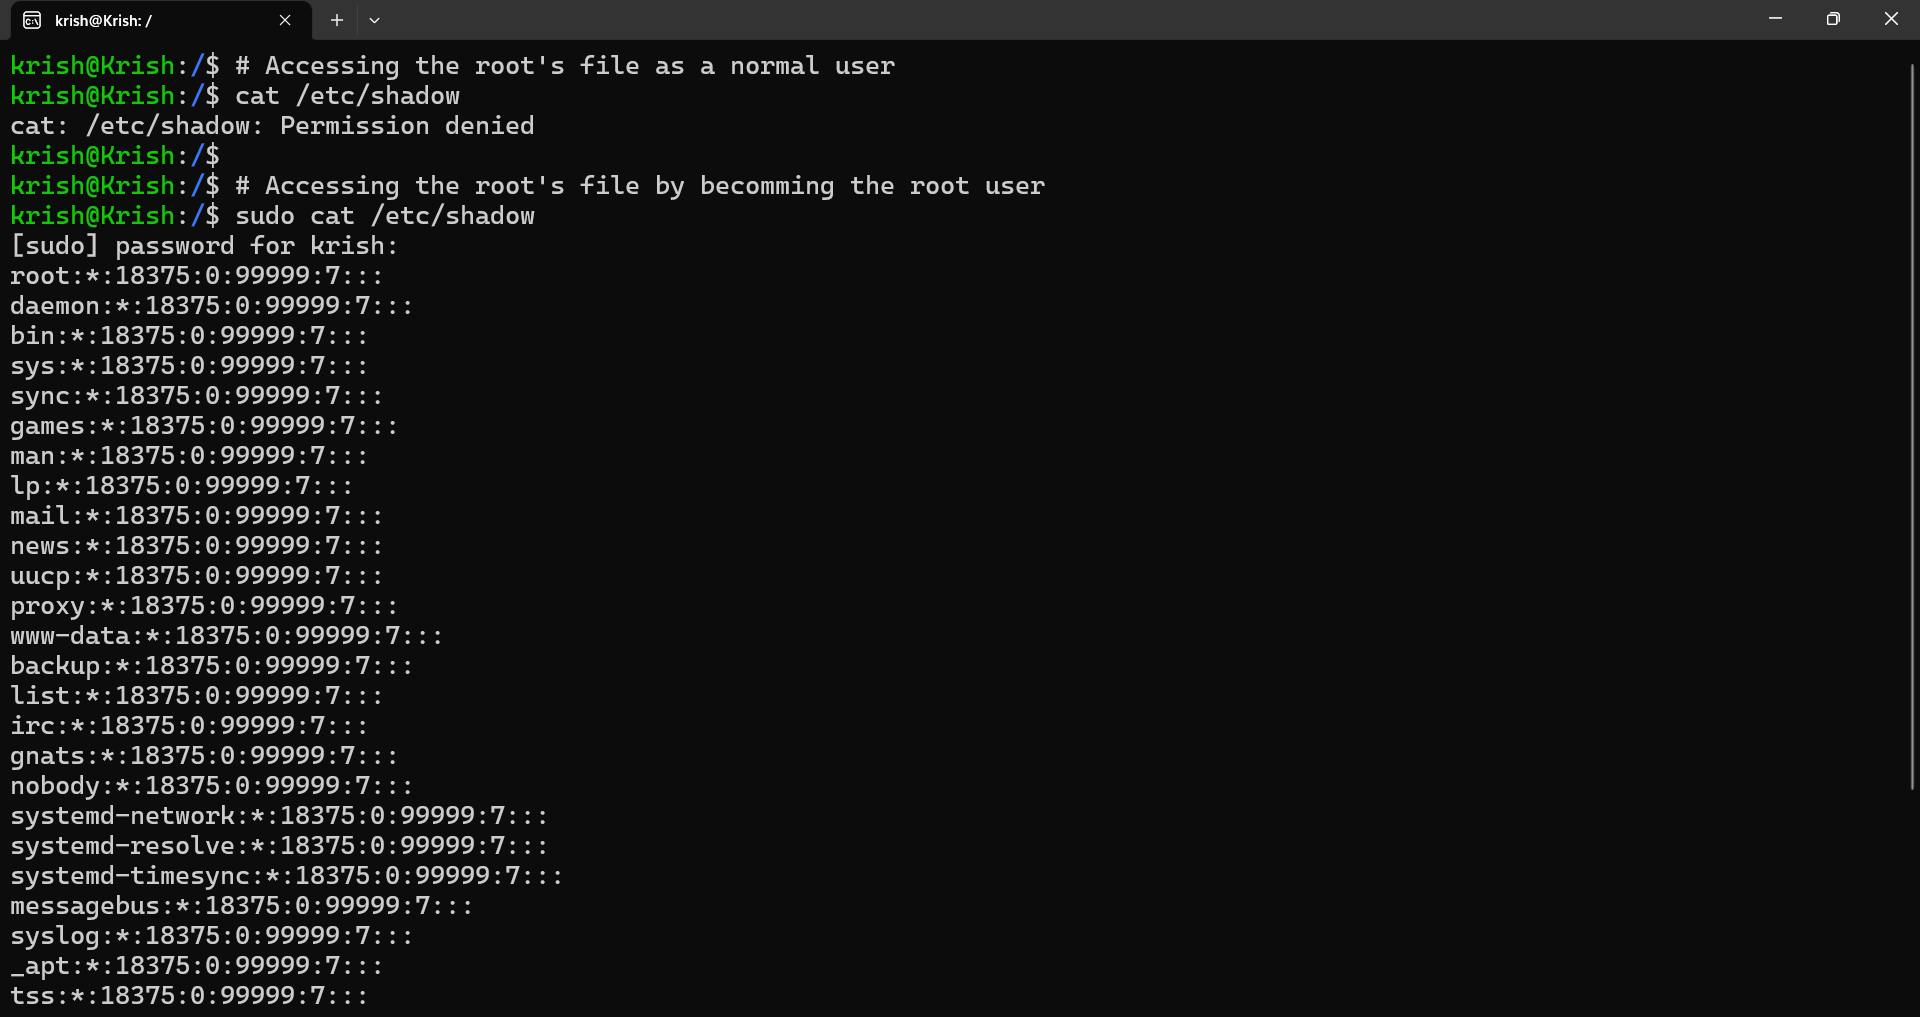
As mentioned above, if we see x written in the password's section of the user information, it means that the password for the user is stored in the /etc/shadow file. Now if we try to look into the contents of this file using the cat command, we get an error - "Permission Denied". Now the question arises - 'Why can't I view the file which is present in my system? What permissions do I need to have?"
The answer is simple. If we run this command: ls -l /etc/shadow, which will long list all the details of this file, we find out that the /etc/shadow file belongs to the root user!

We will understand Permissions shortly, but this needs to be understood:
If a file belongs toUser1, then onlyUser1can access this file. AUser2present in the system does not have the access to the files and folders owned byUser1and vice-versa.
Hence, it is easy to figure out that krish (my user account in the system), can't view the file owned by the root user. Hence, For me to read the passwords stored in the /etc/shadow file, I need to somehow become the root user and Fortunately, there is a way to do this!
This command is called - sudo (superuser do) command!

The sudo command makes you the superuser (root) temporarily and gives you all the powers of the root user. This command is like the key to breaking the limitations that a normal user has and gaining all the permissions of the root user.
To view the contents of the file /etc/shadow owned by root, we can just add sudo before the cat command like this: sudo cat /etc/ And.... We did it!
PRO TIP:
If you encounter a situation where you do not have the permissions to access a file or directory, you can use the
sudocommand to temporarily become theroot/superuserand then have access to them 😅
The sudo command let's you become the superuser for once. Let's say that you need to access the contents of 4 files which does not belong to you. In this case you need to type in sudo each time you perform such an action. But there is a way which let's you stay as the superuser for as long as you desire.
This can be done using the sudo su command. Once you type in the command, you can perform all actions hereafter as the superuser and If you want to exit from this "superuser mode" and get back as the normal user in the system, you can simply run the exit command.
However, using the sudo command or even staying as the superuser using the sudo su command is not recommended as you may unintentionally modify/delete some system critical files/directories which may cause the system to crash.
"With great power comes great responsibilities", Hence if you are performing any action using the sudo command, you need to be extremely aware about the consequences of that action as any wrong step could ruin your system.
Another disadvantage of running commands in the "superuser mode" is that all the commands you execute in this mode are not recorded in the history of your user.
You can refer to the below image for more understanding!

Understanding User Passwords
We now have the access to the /etc/shadow file which contains the password for all the user present in the system. So let's understand that missing piece - User Password. Let's refer to the password of the root user to understand what each term here means 👇👇

This is the breakdown of the password of the root user in my system. As you can see, the Password comprises of 9 parts, each separated by a colon (:). Let's understand what each of the parts represents:
Part 1:
root: This is the username of the userPart 2:
*: This field contains the encrypted password of the user.
If you see a*or/symbol in this field, it means that the user does not have a password set. But If you check out the password of my user account -krish, you will see a long alpha-numeric text in the passwords field (Please zoom in if it's too small to be seen 😅). The password that you see here is not the original password of my user, This is hashed/encrypted using a strong hashing algorithm.
Part 3:
18375: This number represents the number of days passed since 1st January, 1970 when the user's password was last changed.
I know this can be a little difficult to process but there is a way you can convert this number to a human readable date using thedatecommandType in:
date -d "1970-01-01 +18375 days": This command adds18375days to 1st January, 1970 to obtain the date when the password for therootuser was last changed. As you can see in the below image, the password for therootuser in my system was last modified on:23-04-2022
For my user account (i.e,
krish), this field displayed19328which meant that 19328 is the number of days between 1st January, 1970 and The date when I last changed my password. Hence if I ever needed to know the last date on which the password for my user was updated, I can use thedatecommand and add those number of days to1970-01-01like this:
This shows that the password for my user was last updated on 2nd December 2022.
Part 4:
0- This represents the Minimum Password Age. This is a number that specifies the minimum amount of time a user must wait before changing their password again. The value of the Minimum Password Age can vary depending on the system's configuration. For example, the root user may have a Minimum Password Age of 0, which means they can change their password immediately. Some systems may have a Minimum Password Age of 30 or more, which means that once a user changes their password, they must wait at least 30 days before changing it again.Part 5:
99999- This is the Maximum Password Age which specifies the maximum amount of time a user's password can be used before it needs to be changed. For the root user, this value is often set to 99999, which means they can use the same password for a very long time. However, some highly protected systems may require more frequent password changes, so the Maximum Password Age may be set to a lower value, such as 30 days. When the Maximum Password Age is reached, the user is required to change their password for security reasons.Part 6:
7- This is the Password warning period which is the time when the system warns users to change their password before it expires. By default, the Password warning period for therootuser is 7 days. This means that the system will issue a warning message to therootuser 7 days before their password expires. This setting helps users remember to change their passwords regularly, improving the security of the system.The fields
7,8and9are empty for therootuser:Part 7: - The Inactivity Period is the amount of time a user can remain inactive before being automatically logged out of the system. This setting helps to improve the security of the system by preventing attackers from using inactive accounts to gain unauthorized access. If a user's Inactivity Period is set to 7 days, for example, and they are idle for that amount of time, the system will automatically log them out or terminate their session. This ensures that only active and authorized users can access the system, making it more secure.
Part 8: - The Expiration Period of the password is used to give temporary access to a guest user. For example, if a new user is created in the system with an expiration period of 7 days, their password will expire after 7 days and their account will be temporarily disabled. This helps to improve the security of the system by ensuring that guest users only have access for a limited period of time. After the expiration period, the system will automatically log out the guest user and disable their account until further action is taken.
Part 9: - This field is kept empty for all the users. Currently, it does not serve any purpose and thus can be ignored but it is "reserved for future use" and might come to some use in future.
Groups in Linux
As there are "individual" user accounts, there are also "groups" of users in the system, who share the same permissions and resources. Think of it like WhatsApp or Telegram groups where members can access shared media, but non-members cannot. Your system has several groups, and you can find them by typing in: cat /etc/group in the terminal.
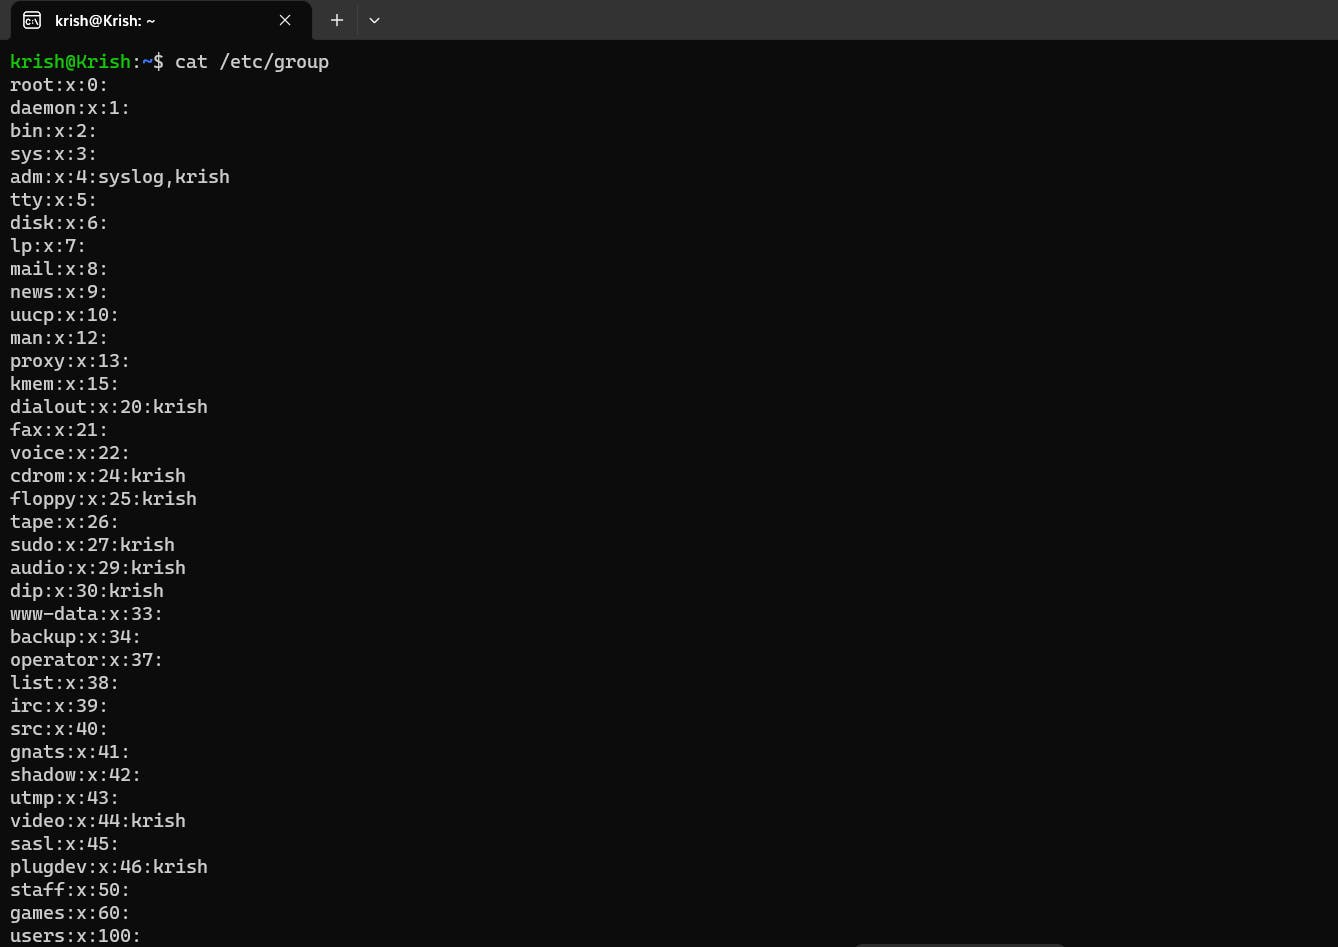
The /etc/group file contains information about the groups similar to how the /etc/passwd file used to keep information about the users.
If you check the above image, there is a group called adm (on the 5th line of the output). Let's study this group's information to understand what it means:
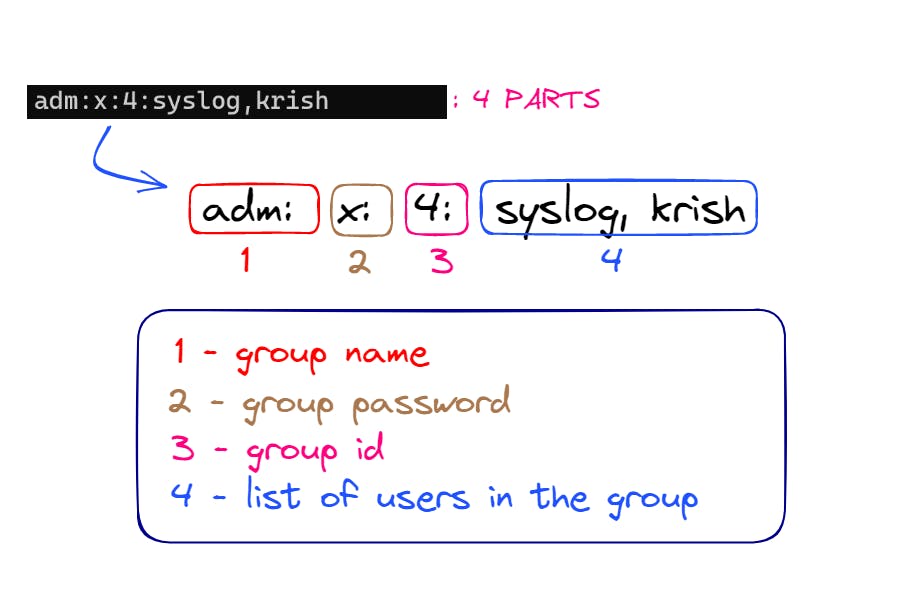
Part 1:
adm- This is the name of the group.Part 2:
x- This is the group's password. If you findxin this field, this means that the group does not have a password. The members of the group can simply enter or leave the group without needing to enter the password. This is known as an open group or an unsecured group.On the other hand, if the password field contains an encrypted password string, it means that the group is secured and requires a password to become a member. Only users who know the password for that group can join it.
Part 3:
4- This is the Group Id (gid). Just like individual users are identified by the system using a unique user id (uid), Similarly Groups are also given a unique id calledgidso that it's easy for the system to identify them.Part 4:
syslog, krish- This field contains the names of the user members of the group. In this case, theadmgroup's members are:syslogandkrish.
Some Commands To Note
Before moving forward to learning about Permissions, Let's have a look at 4 commands you should note:
Creating a user -
sudo useradd user_nameThis command adds a new user in the system with the nameuser_namewith default settings. When a new user is created, the following changes happen -A
/homedirectory is created for the user.A default shell is provided for the user, for example:
/bin/bashOther settings like the userid, password, group membership, etc are given default values by the system.
These default settings may vary from system to system.
Deleting a user -
sudo userdel user_nameThis command deletes the user account with the name -user_name. It also reverses the changes which happened when the user's account was created (as mentioned above).Changing the password for a user -
sudo passwd user_nameThis command allows you to change the password for a user. Suppose you want to change the password of your user, run this command:passwdChanging the hostname of a user -
sudo hostname new_name
In the below image,krishis the user name andKrishis the hostname.
Username is the name given to a user in the system whereas hostname is the name of the computer/device connected to the network.
Here, I tried changing my hostname from
Krish->krishtwts:
The change did not show up, so I closed and re-started my terminal and now it's visible:

Permissions in Linux
The files and folders present in the system have certain permissions.
The 3 fundamental permissions are:
The Read Permission denoted by
rThe Write Permission denoted by
wThe Execution Permission denoted by
x
Different users have different permissions to access the file/directory. For example, If you create a myFile.txt file in your Desktop directory, You become the owner of this text file. Hence now you can read (r) and write (w) to this file. The execution permission is not available to any user because of the file being a .txt file.
Suppose there existed another user in your system called rohit. The user rohit cannot access this file because this is not owned/created by him or in other words he does not have the permissions to read (r) or write (w) to this text file. Similarly, the files and directories which are created/owned by rohit can be only accessed by him, any other user in the system cannot have the access to it.
Of course, these permissions can be modified to decide who can have what level of access to the data. In this section of the blog, we will try to understand these permissions.
Let's create a folder in your home directory and view the details of this folder using the ls -ld command like this:

You will see a lot of data displayed in front of you. Let's understand what each of these terms mean:
drwxr-xr-xis the permissions of the directory. This single term holds all the folder permissions.2is the number of hard links to this file (We will look at this some time later)krish krishHere, the firstkrishis the owner of the file and the secondkrishis the name of the group which owns the file.4096is the folder size in bytesMar 17 16:58: This is the date and time the folder was last modified.newFolder: This is the name of the directory.
Everything looks clear now except the permissions part of it, So let's understand the folder's permissions:

The permissions consist of 4 parts which as displayed in the above image which makes it's size upto ~10bits in total:
Part 1:
d- This part tells you whether it's a file or a directory. If it's a directory, it's represented by the letterd; otherwise, it's represented by a hyphen-.Part 2:
rwx- This part represents the permissions that the owner and therootuser have over this file/directory. Therwxmeans the owner and root user can read, write, and execute this folder.
These permissions are associated with the owner and are collectively represented byu.Part 3:
r-x- This part represents the group that owns the file or directory. This means that the members of the owning group canreadandexecutethis folder but they don't have the permission towriteto it.
The-(hyphen) in thew(write) position signifies the absence of thewpermission.
These permissions are associated with the owning group and are collectively represented byg.Part 4: This part represents all other users who are not the owner or part of the owning group. The
r-xpermissions in this part allow them to read and execute the file or directory, but not make any changes to it.
These permissions are collectively represented byo.
Each part of the permission string is made up of three bits, except for Part 1, which is only one bit. In total, the permission string is around 10 bits long, with the order of each part always being consistent.
Changing Permissions
Once you create a folder, the default permission is: drwxr-xr-x and on creating a text file, the default permission is: -rw-r--r--. However, these permissions can be modified. Let's look at ways to modify the default permissions.
Using the chmod command: The permissions of the folder which we had created previously were - drwxr-xr-x.
Suppose we wanted to give the owning group or g of this directory, the write permission or w. In mathematical terms, we want to do something like this: g+w. We can do this by running the following command: chmod g+w newFolder.
This command will add (
+) the write permission (w) to the group owner of this directory (g)

Now Let's say we did not intend to do what we just did 😅 and we want to remove the write w permission which we gave to the group owners g of the directory. To do this, we can run this command: chmod g-w newFolder. Hopefully, you can think of other permutations and combinations!
Another example of this command: Suppose we wanted to add all the permissions (read, write and execute) to the users, groups and others we can run this command: chmod ugo+rwx newFolder and to remove all the permissions we just gave, we can just replace the + with a - sign.
Numeric Way Of Changing Permissions
There is a way where ugo+rwx can be changed to just 3 digits. This is what we are referring to as the numeric way of changing permissions. To know how we can do this, we need to first understand what those 3 digits mentioned above represent.
The first digit will contain the permissions of the owner /
uThe second digit will contain the permissions of the owning group /
gThe third digit will contain the permissions of other users /
o
Each of the digits can range from 0 to 7.
Each digit is a sum of three numbers:
4 represents the read permission (
r)2 represents the write permission (
w)1 represents the execute permission (
x)
For example, a file with permissions -rwxr-xr-x can be represented as 751 in numeric code. This is the breakdown of the 3 digit number 751:
7: This is the first digit which refers to the permissions of the owner of the file.
As you can notice, 7 = 4 + 2 + 1. This implies that when we write 7 we are essentially saying - "All the permissions of read r, write w and execute x are provided". This means that the owner of the file can read, write and execute this file.
5: This is the second digit which refers to the permissions of the owning group of this file.
Here, 5 = 4 + 0 + 1. This implies that when we write 5 we are essentially saying - "All the permissions of read r and execute x are provided but the write w permission is not provided". This means that the owning group of the file can read and execute this file but not write to this file.
1: This is the third digit which refers to the permissions of the other users.
As you can notice, 1 = 0 + 0 + 1. This implies that when we write 1 we are essentially saying - "All the permissions of execution x are provided but the read r and write w permission are not provided". This means that the other users can only execute/run this file.
To change the permissions of a file using the Numeric way, you need to use the chmod command followed by the 3-digit code. For example, to set the permissions of a file to rw-r--r--, you can use the command:
chmod 644 filename
This command sets the read and write permissions for the file owner, and read-only permissions for the group owner and other users.
I found a wonderful illustration on this topic by KMohan on Twitter: You can check this out for greater understanding:

Conclusion
With this we come to the end of this blog. I hope you enjoyed reading this blog, If so do give it a Like. This blog is a part of the Linux In One Go Series, to read more such blogs from this series, just visit my personal blog on Hashnode.