Learn Linux Basics
Hello folks, In this blog I will be sharing my learnings about the Basics of Linux which includes some basic Linux terms and commands!


Hello there, I am so glad that you clicked to read this blog!
This blog is a part of the series - Linux In One Go where I share my learnings about the Linux Operating System, So without wasting much time, Let's get started with the Part 1: Linux Basics Blog.
What is an Operating System?

Operating System is a software used to manage and operate a computing device, like ATM, Laptop, Desktop, Tablets, Mobile Phones and even Super Computers!
Windows, MacOS and LinuxOS are some of the most popular and widely used O/S.
An Operating System is just a common term which includes many many things within itself. Let's understand some components which make up an Operating System.
Some of the components of an O/S are:
Kernel : This is the core of every operating system. It acts as a bridge between the software and the hardware and facilitates interactions between them. It lies at the base of the O/S which communicates with the Hardware and makes things work.
A Kernel has significant control over your computer's hardware and other resources like:
CPU
Memory (RAM)
Input / Output (I/O) Devices like keyboard, mouse, hard disk, USB drives, etc
File System : A File System is a method or a Data Structure that an O/S uses to store & retrieve the data in the memory. It is a way for your computer to organize and keep track of the files and folders you have saved on your hard drive. So when you open a file or save a new one, your computer uses the file system to find it and work with it.
User Interface (UI) : A UI is what allows the user to interact with the computer system and perform various tasks. A UI can be either a GUI(Graphical User Interface) or a CLI(Command Line Interface) which is built on top of the Kernel.
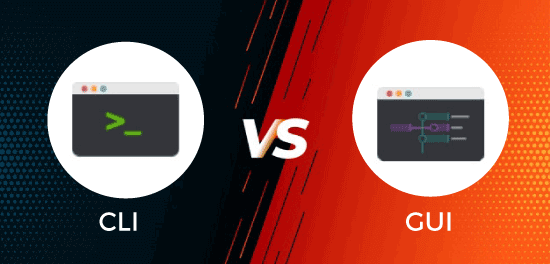
CLI: CLI is a text-based interface where the user types in commands to interact with the system. You must have seen those cool looking Terminals used by Hackers in movies, that is an example of a CLI!
GUI: A GUI is a visual interface that allows the user to interact with the system using windows, icons, menus, and buttons. It is much more easier to use and intuitive as compared to a CLI. The below image is an example of GUI!

For any software to be called as an Operating System (O/S) it should atleast have a Kernel, File System, A User Interface (GUI and CLI) and it should be able to manipulate data based on the commands we give!
Why Choose Linux?
There are several reasons why you should choose Linux as an Operating System which are as follows:
Open Source Nature: This means that Linux is free to use and anyone can see and modify the code that makes it work. This allows for lots of people to collaborate and make it better. Imagine that some unexpected errors occur while you are using Linux, You can actually go and browse the Linux codebase and look for how everything works internally and if you see some problems, you can make improvements and contribute and if your changes to the codebase is approved, you might see those changes rolling out in the next release!
Supports almost all programming languages: This means that if you want to write computer code, Linux will work well with whatever language you choose to use.
Development Tools: Linux has many built-in tools that make it easier for programmers to write, test, and debug code.
Linux Terminal is superior to CMD(Command Line): Linux's terminal is considered better than the one used in Windows (CMD) because it has more features and is more powerful.
Bash Scripting: This is a way to automate tasks on the computer using text commands. Linux has a powerful tool called Bash that makes this easier.
SSH: This stands for Secure Shell, and it allows you to securely connect to other computers over the internet. This is useful for remote work or for managing servers.
Popularity: Last but not the least on the list is its immense popularity amongst the Developer community. Lot's of people and organizations use Linux which makes it a good choice to be learnt!
When we say Linux Operating System we are basically referring to Linux Distributions like Ubuntu, Kali Linux, Fedora, openSUSE, centOS, etc. Linux Kernel was developed in 1991 by Linus Torvalds which is commonly used by most of the modern-day Linux Distributions out there.
There are 100's of Linux Distributions, amongst them the 3 major Linux Distributions families are:
Red Hat Family Systems which include centOS and Fedora
SUSE Family Systems which include openSUSE
Debian Family Systems which include Ubuntu and Linux Mint
If you want to learn Linux and it's commands, you need to install a Distribution. Now, Don't get tensed as which Linux Distro (short for Distribution) you will have to pick amongst so many!
I am currently using Ubuntu as my Linux O/S so I will share my learnings using it but at their core all distributions like Ubuntu, Kali Linux, Fedora etc, all of them use a common Linux Kernel, so essentially most of them work around similar lines!
Few Other Terminologies
So, Before we quickly move on to Installing a Linux Distribution and learning some of the basic commands, we need to know a few more terms related to the Linux CLI as we will be typing commands in it.
Terminal: A Terminal is a text input and output environment which is also called as a console. It's main function is to launch a shell.
Shell: A Shell is a Command Line Interpreter. As you might have an idea, that when you use LinuxOS, whatever you do through the mouse and with clicks using the GUI, the same you will be doing through your keyboard using the CLI by typing in some commands.For example, like you create a file in your Desktop using the GUI, the same thing you will be doing using the CLI by typing in a command called
touch newfile.txt.So, when you type in this command in the Terminal or Console, there will be an interpreter which interprets/executes/runs the command you typed in, this interpreter is called Shell.
The Shell interprets commands line-by-line thus executing one command at a time. Once the first command is executed, it then asks you for the next command! It can also be said that it takes the command you typed in and gives it to the Kernel to perform, since a CLI is made on top of the Kernel and the Kernel is the one which facilitates interactions between the software(your CLI) and the hardware(The Hard Disk).Bash Programming: Most shells use 'bash' as their programming language, Therefore all the commands you type in the Terminal is basically 'bash', and thus what you do is called Bash Programming or Bash Scripting.
Terminal launches the Shell.
A Shell is an interpreter for the Bash Programming Language we write in it!
Installing Linux On Windows Machine
If you have a Linux Machine, then there is no problem at all!
If you are having a Mac machine, in that case also, there is no need to worry because both LinuxOS and MacOS are Operating Systems which are UNIX based, hence most of the commands which run on Linux O/S will also run on MacOS.
But that is not the case with Windows!
To run Linux on Windows Machine, there are 3 ways:
WSL2 - WSL stands for Windows Subsystem Linux. It is basically a light-weight Linux which is suitable for those who do not have a powerful machines.
VM Ware - VM stands for Virtual Machine. It is another way to install Linux on your system which is superior to WSL as it gives you greater insight into How Linux works internally as compared to WSL. For this you will need the following:
Atleast 4GB of RAM (It will acquire some space in Hard Disk as well)
Atleast 25 GB of Free Hard Drive Space
Powerful machine to support the VM
Booting USB - In this method, you need to download the ISO file from the distribution's website which is a large file needed to install the O/S and then copy it onto the USB drive with the help of a program called Rufus or Etcher. The next step is to configure the computer's BIOS settings to prioritize the USB drive over the hard drive. Once it's done, you can restart the computer and it should boot from the USB drive. This will load the Linux operating system from the USB drive and allow you to start the installation process.
I don't want to make the blog unnecessarily lengthy by adding detailed steps regarding Installation of Linux by each of the method mentioned above. There is a very detailed video about Installing Linux On A Windows Machine on YouTube by Apoorv Goyal. You can check the video out here - https://youtu.be/nRpmRDm-QrQ
Commonly Used Linux Commands
Now let's move on to learning some of the commonly used Linux commands which you should be familiar with. For this section of the blog, it would be much better if you type in the commands along with me in your Linux Terminal. MacOS users will have not much problem but Windows users need to complete the installation procedure to get started with this section. So after the setup is complete, Let's get started!
echo: Just like all the programming language, Bash gives you the
echocommand to print something in the console. It is similar to theconsole.log()in Javacript orSystem.out.println()in Java. As you see in the below image, Hereechois the command andHi! Hello Worldis the argument.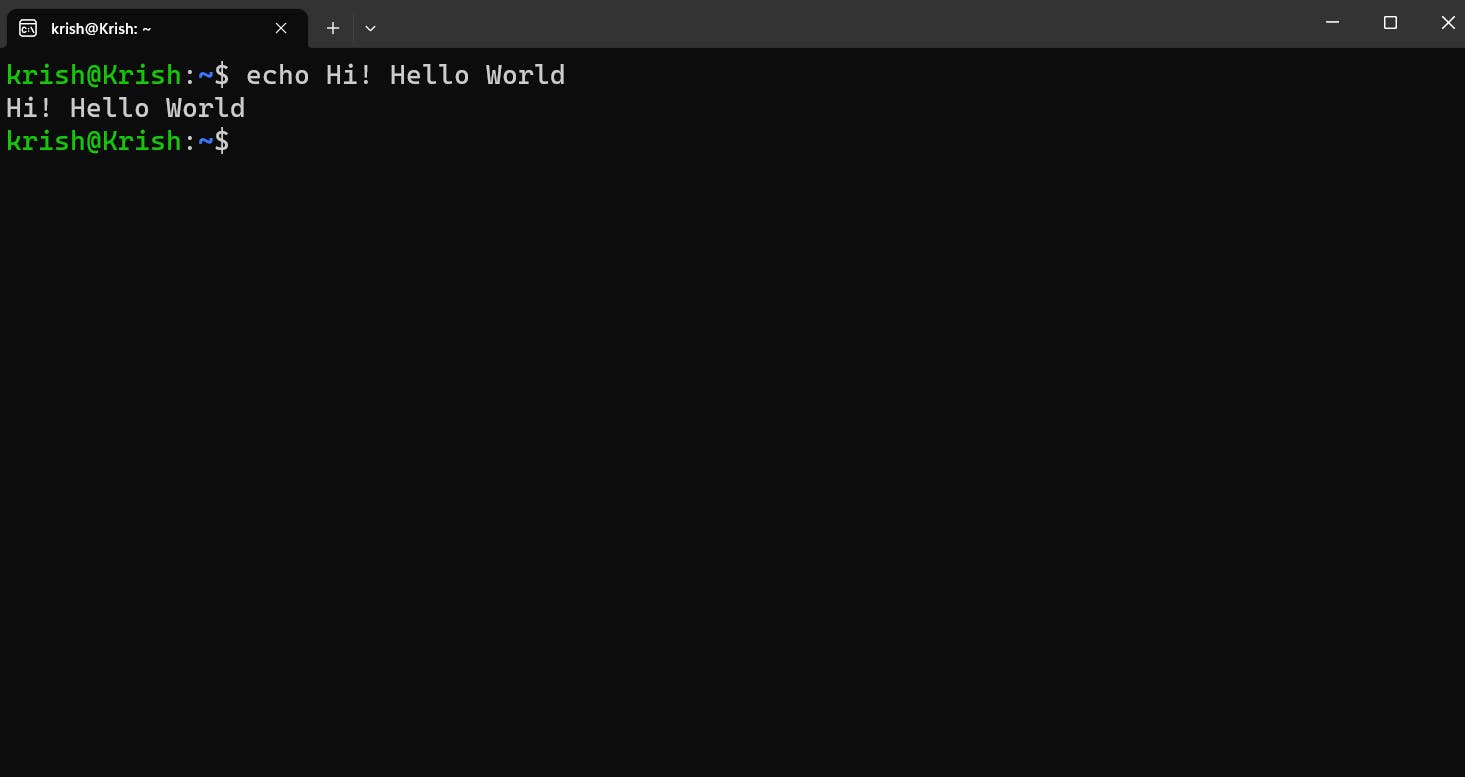
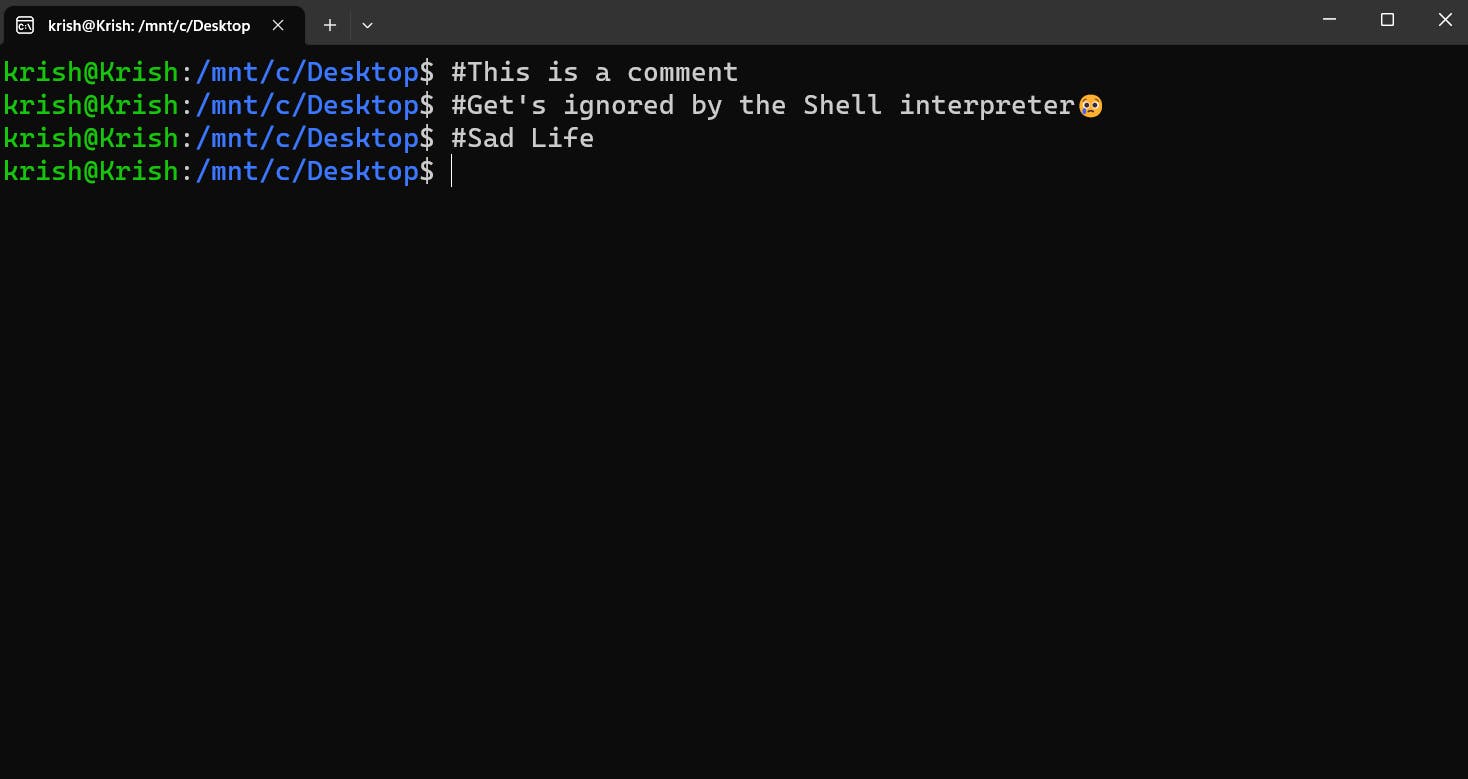
Comments (#): As any programming language, Bash allows you to use comments in the terminal. A comment is something which does not get interpreted by the Shell. A comment does not mean anything to the Shell, it is for your understanding. You can write a comment using the hashtag (#) symbol in the Terminal.
Before moving on to the next command, you need to understand a little bit about the File System:
You may know that a file or a folder present in your computer has a certain path. The Desktop button which you see in the image below is also a directory/folder which has other directories present in it like WebDev, Resources, BNI, etc.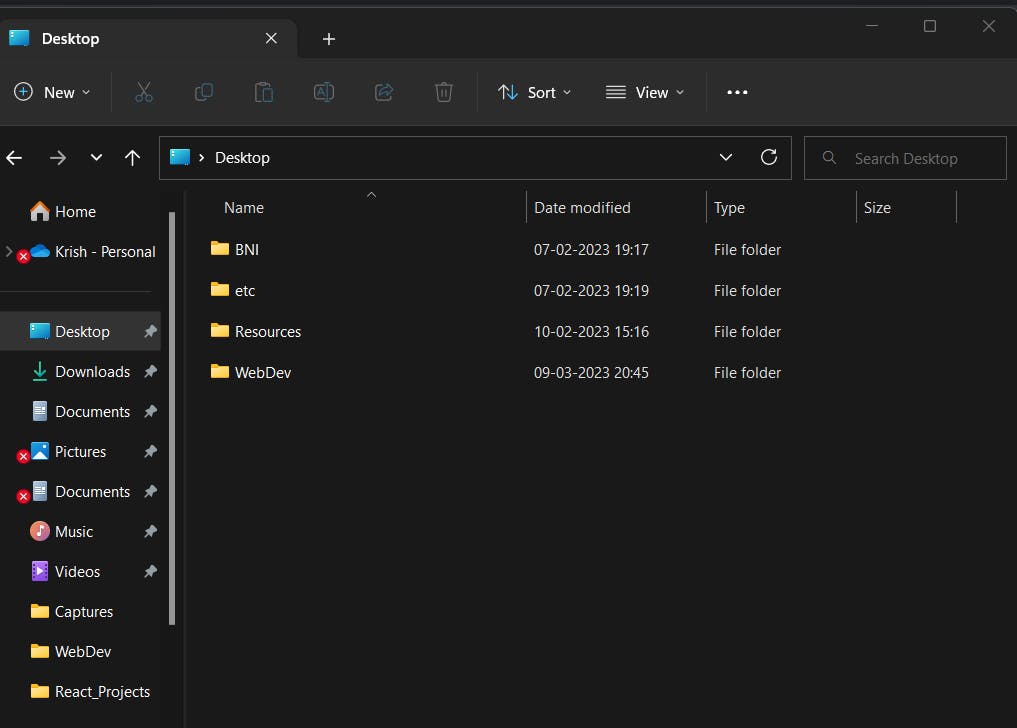
These folders follow a tree structure/hierarchy as shown below:
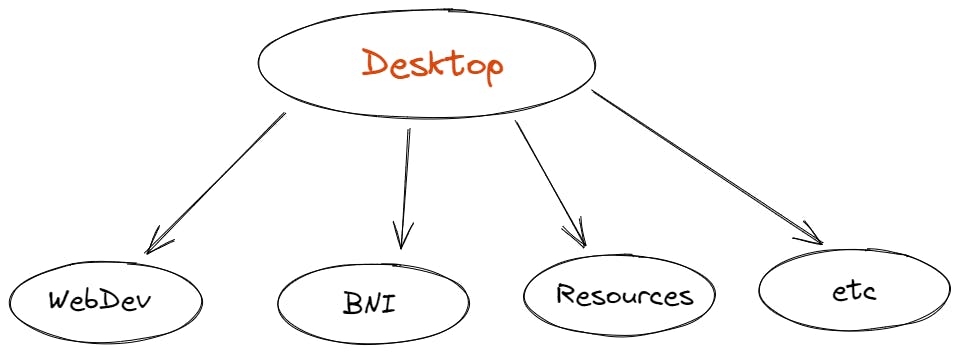
The above image is a diagrammatic representation of the folder structure.
The Desktop is the parent directory with WebDev, Resources being its child directory. The path to the WebDev directory will be: Desktop/WebDev.
Similarly, the path to the Resources directory will be: Desktop/Resources.The Desktop has its own parent directories. There is something called the root directory which is represented by a forward slash -
/. As the name suggests, this is a directory from which all the directories arise and the root directory does not have any parent directory as this is the first one in the tree structure.
In my computer, the Desktop folder lies on this path:/mnt/c/Desktop.
When you just start out, you will have to navigate from the root directory to the Desktop directory, using a command called thecd- change directory command.cd: Assumning that your Linux Terminal looks something like this:

To navigate to the first directory which is the root directory, type in the
cdcommand and the path to the root directory which is /.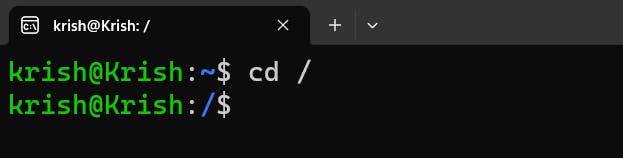
Now, you need to find your way up to the Desktop directory. Here you will be needing the help of another command to get you to your destination which is the -
lsor List Items command.ls:
lscommand displays all the directories and files present inside the current working directory (current directory - the folder you are currently present in). So now, you are present inside the root directory -/. To find your way to Desktop, you need to know what are the files present in root. You can do this by just typinglsinto your terminal.
Here you can see a lot of folders like
bin,boot,devare present in the root directory. Most users have their Desktop located in the/home/username/Desktopdirectory.Since you are already in the root, you can simply type:
 cd home
 ls //you will find a directory with the name of your username of your Operating System
 cd username
 ls //Here you will probably see a Desktop directory
 cd Desktop//Congrats you are now in the Desktop directory!!!
Essentially what we did till now is we:
moved into the root directory
/moved into
homedirectorymoved into
usernamedirectorymoved into
Desktopdirectory
Either you can do it this way which is a pretty long way of moving into a child directory which is located far away from the root or you can do it in one step: cd /home/username/Desktop. This single statement is like a short cut way of what we did above.
Now, if you check the below image of my process, you will find that when I finally moved into my username directory - krish, and did a ls, nothing showed up, meaning my krish directory is empty.

For me, I found my Desktop folder here: cd /mnt/c/Desktop. Check the process (the lengthy way) below:

To summarize the process in one command, To navigate to the Desktop directory in my machine, I just did: cd /mnt/c/Desktop.
pwd:
pwdstands for Print Working Directory or Present Working Directory. Typing inpwdin the terminal will give you the path of the current directory from the root directory.
For example, Considering that you are now inside the Desktop, type in pwd to get the Absolute Path of the Desktop directory:
clear: If you see that you have typed in too many things in your console and it has got messy, you can simple type out
clearto clean up the console and to erase everything.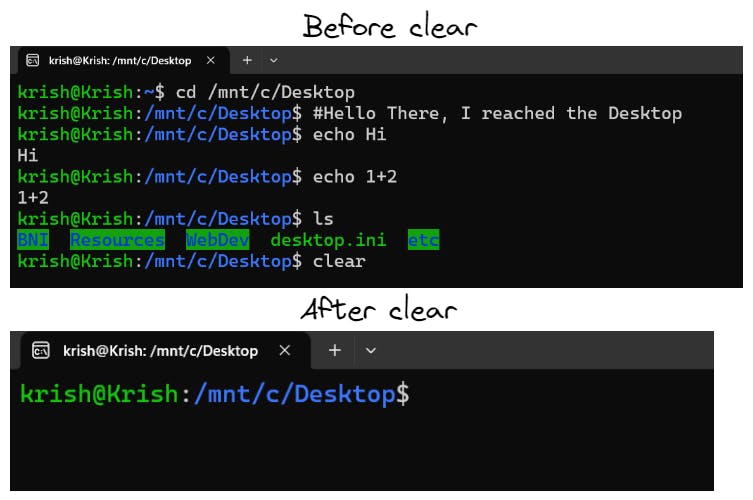
mkdir: The mkdir stands for make directory which allows you to create a Directory or Folder. To create a folder called 'TestFolder' inside the Desktop, type in:
mkdir TestFolder. As you see in the below image, I did not have aTestFolderdirectory previously but running the command created one for me!
mkdir creates a child directory inside the working directory.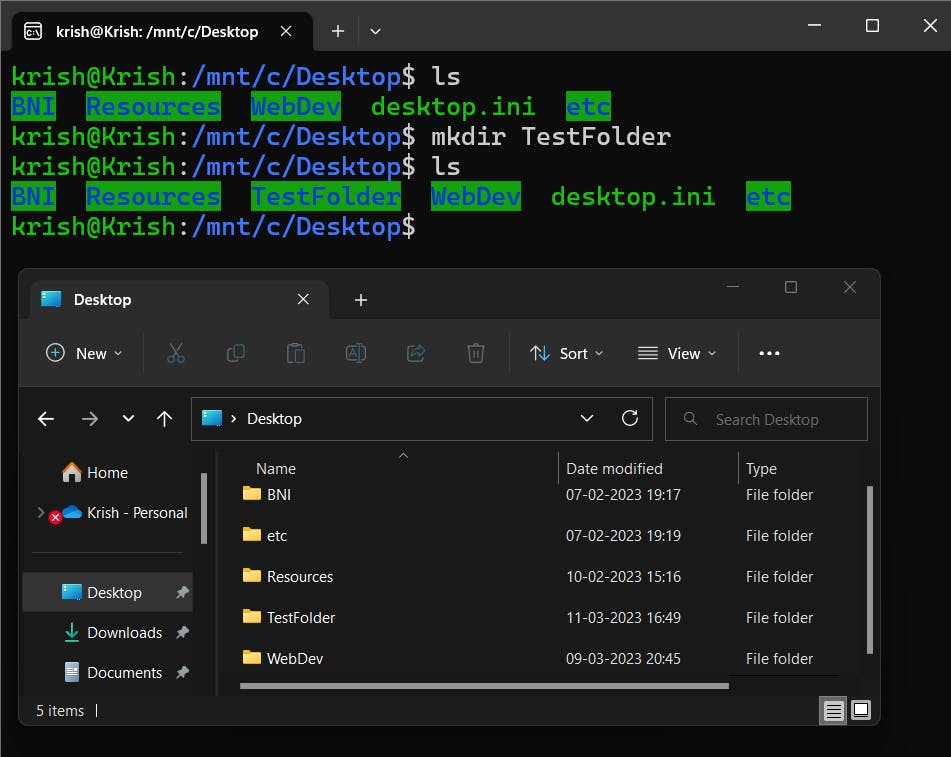
touch: Now if there is a way to create a Folder using the CLI, there shall also exist a way of creating a File using the CLI. That's what the touch command does!
To create anames.txtfile, you need to type in:touch names.txt, like this: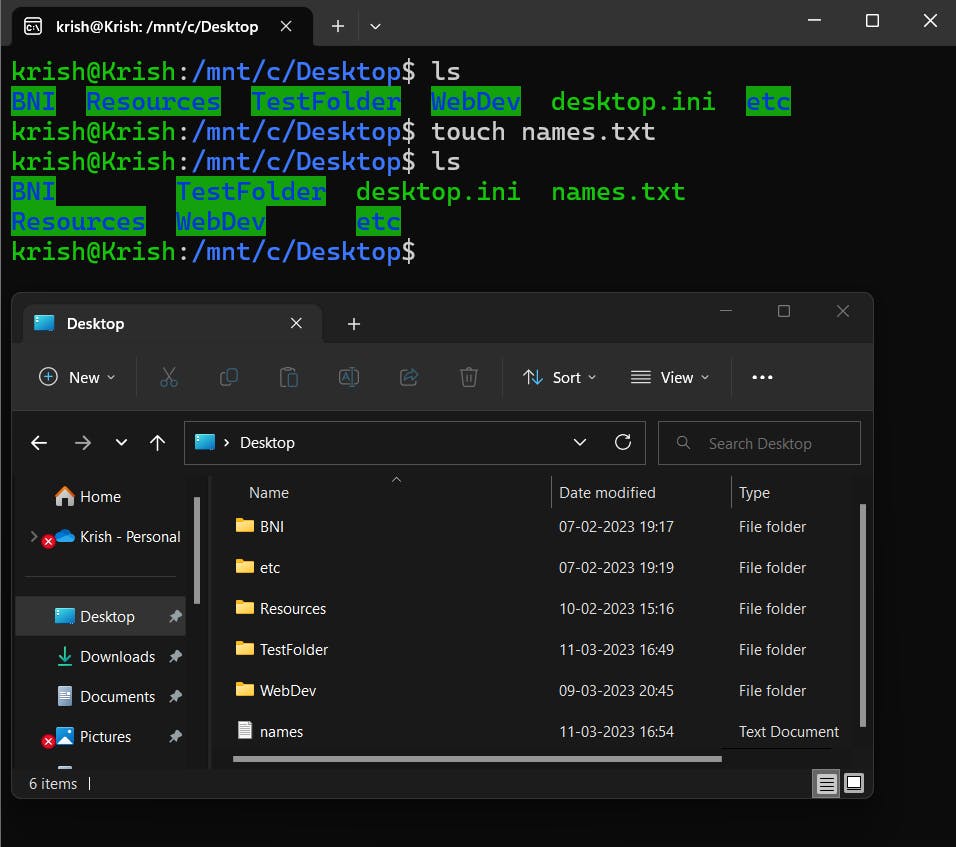
The touch command creates a child file inside the working directory.
file: This command gives us some information about the file which is provided to it. For example: Lets type in:
file names.txt, (referring to the names.txt file we created previously).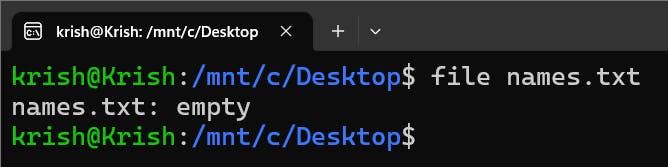
This shows that the
names.txtfile is empty, which is true as it does not have anything written in it. Let's go ahead and type in the following in the names.txt file:Hi, I am Learning Linux Commands!manually. (Open the file using the GUI and type it in it and press Ctrl + S to save!)
Type infile names.txtagain and you will see that it shows you the following information about the file: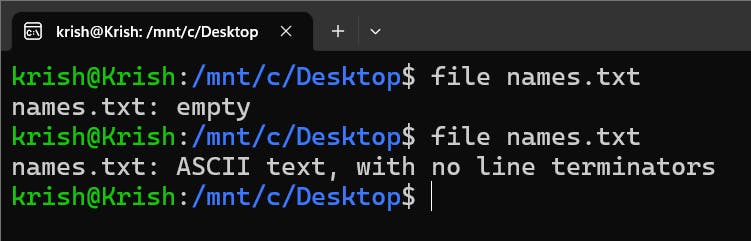
cat: The
catcommand allows you to print all the content of a file in the console. So if you type in:cat names.txt, it will print out everything written inside the names.txt file:
cp: The
cpcommand is like the Copy-Paste command. It is very much similar to the Copy and Paste we use for files and folders using the GUI.
The syntax forcpis:cp [file_path] [directory_path].
If you recall, we had created a TestFolder and a names.txt file inside the Desktop directory. Note thatTestFolderandnames.txtare children toDesktop.
In order to Copy thenames.txtfile and Paste it inside theTestFolder. We need to type in the following:
Once you do this, you will see that the
names.txtfile exists inside the Desktop directory as well as the TestFolder directory which is exactly what happens when you do the traditional Copy + Paste (Ctrl + C & Ctrl + V).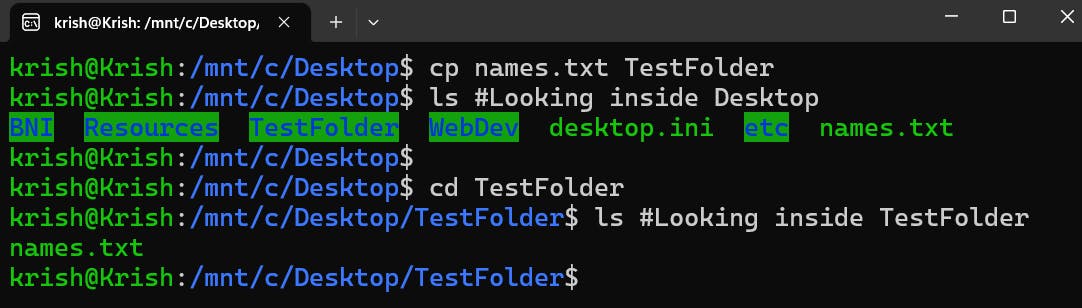
mv: The
mvcommand stands for move, It is basically a CLI way to do Cut + Paste! Let's actually see what is this command hand's on.
Over here, I first created another file called
names2.txtin Desktop and then did:mv names2.txt TestFolder. Then I looked inside the Desktop as well as TestFolder using thelsstatement where I found thatnames2.txtwas not present in Desktop but was present inTestFoldersimilar to what happens using Cut + Paste.rm: The
rmcommand helps you remove/delete a file. As we know, inside Desktop, there is a file called names.txt, Let's Delete this file!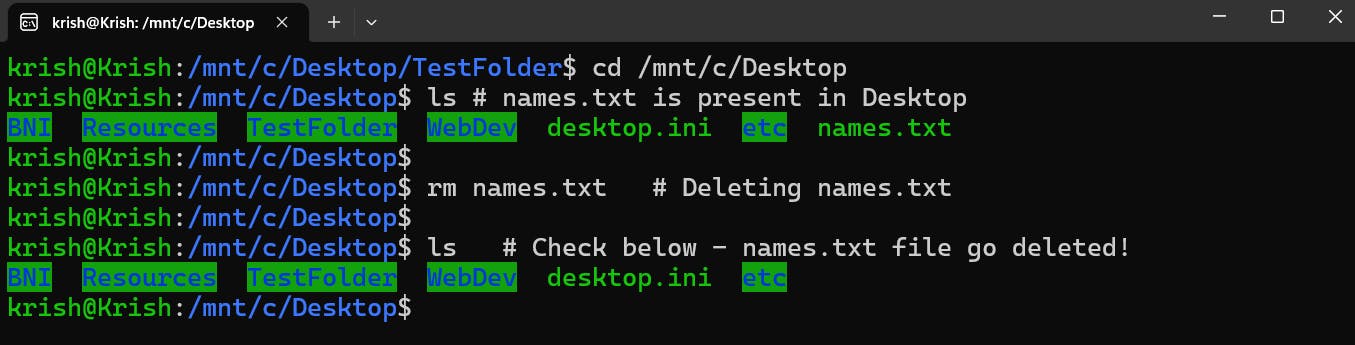
rmdir: As there is a command to delete a file, there is also a command for deleting a folder/directory. Let's actually create an empty directory inside Desktop and then delete it using the
rmdircommand to learn it hands-on!
With this, we come to the end of this section. You learned the most commonly used Linux Commands which you will use quite frequently!
Let's have a quick recap of what all the commands do in brief:
| Command Name | Syntax | Function |
| echo | echo [Something to print] | Prints message to the console |
| # (Comments) | # [A comment] | Ignored by interpreter. Helps to improve |
| understanding of the code you write | ||
| cd | cd [Folder_path] | Navigates to the Folder_path given |
| ls | ls | Displays all the files and folders inside |
| the present working directory | ||
| clear | clear | Helps to clear/clean the console |
| pwd | pwd | Gives the Absolute Path of the |
| present working directory | ||
| mkdir | mkdir [Folder_name] | Creates a child directory with the name |
| provided to it, inside the present | ||
| working directory | ||
| rmdir | rmdir [Folder_name] | Deletes the Folder provided to it |
| touch | touch [File_name] | Creates a child file with the name |
| provided to it, inside the present | ||
| working directory | ||
| rm | rm [File_name] | Deletes an Empty Folder provided to it |
| file | file [File_name] | Gives some information about the File |
| provided to it | ||
| cat | cat [File_name] | Prints all the contents of the file in the console |
| cp | cp [File_name] [Folder_name] | Copies the file provided to it and pastes it in the Directory given |
| mv | mv [File_name][Folder_name] | Cuts / Moves the file provided to it and pastes it in the Directory given |
Flags and Short Cuts
I welcome you to this section of the blog where we discuss about some of the handy shortcuts you must know when you use Linux and we will also discuss about what are flags in Linux!
Flags in Linux are additions to commands which we just learnt in the previous section. They can be thought of as the Cherry on Top of the Cake (Commands!). They increase the functionality of the commands.
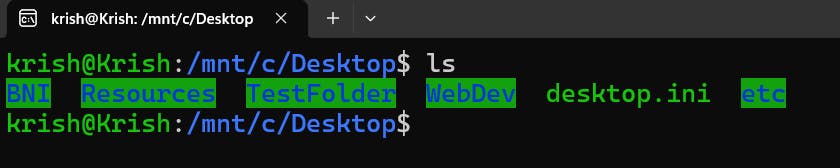
Let's take the ls command as an example - Navigate to your Desktop Directory and type in ls. Here is what I get:
But what is I told you that there are more files present in the Desktop directory than what we can see over here!
There are some files which are called Hidden Files - most of them start with .(dot) as a prefix to their name. Let's create a file called - .hiddenFile.txt (Notice the dot before the file name) and then Let's see whether the ls command displays this file or not!

Check this out! With the dot prefix (.) we created a hidden file which is not shown by the ls command. In order to see all the files - both visible and hidden, we need a flag!
Now type in: ls -a and check what happens:

Check the above image, When we type ls -a, we see many additional files which the simple ls command couldn't show us like the .hiddenFile.txt is now visible, in addition to it we also get something names - . and ..(We will have a look at them later!). Here the a was a flag used with the ls command to increase it's functionality.
There are other flags in addition to the a flag which can be used with the ls command like:
A: ls -l: The l flag which stands for list long, it gives all the detailed information about all the visible directories present in the current working directory like their Permissions, Date and Time of Modifications and so on... Let's clear the console and type in this command inside the Desktop Directory as well as the TestFolder Directory:
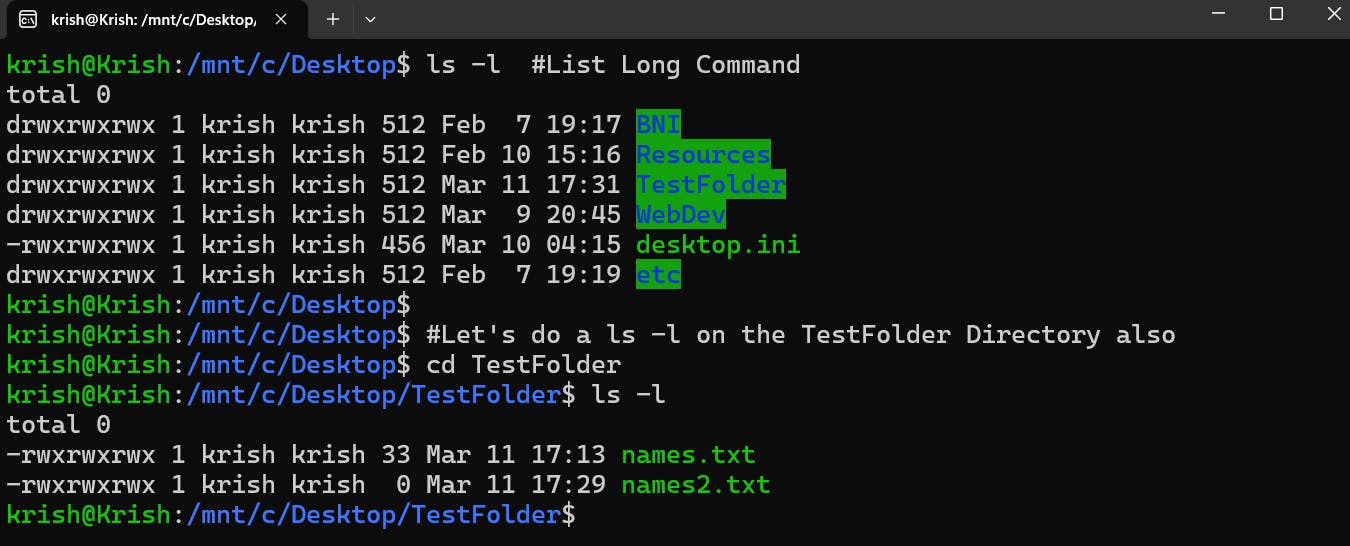
As you can see the 6th and 7th column from the left of the Table, It tells you that the TestFolder Directory was created on March 11 ( The date when actually created this Folder!) along with other details about it.
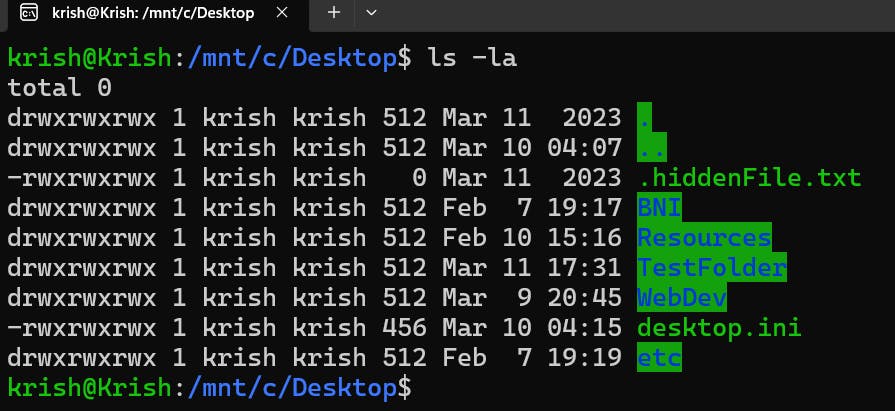
B: ls -la: If you noticed the ls -l command, it gives you detailed information about the Visible Directories but It does not tell us about the Hidden ones, So for this we can type in the ls -la command with the l and the a flag combined:
There are many many flags which can be attached to the ls command.
Obviously, we are humans and keeping in mind all the different flags and commands is not at all possible, for this I have a good news for you!
There exists a command called man which stands for manual. This is like a manual book for Linux. It can be said that by using this man command, you can in a way access the Linux Documentation!
Suppose you want to know more about the flags which can be used with ls command. Just type in: man ls, To get complete information about the ls command!

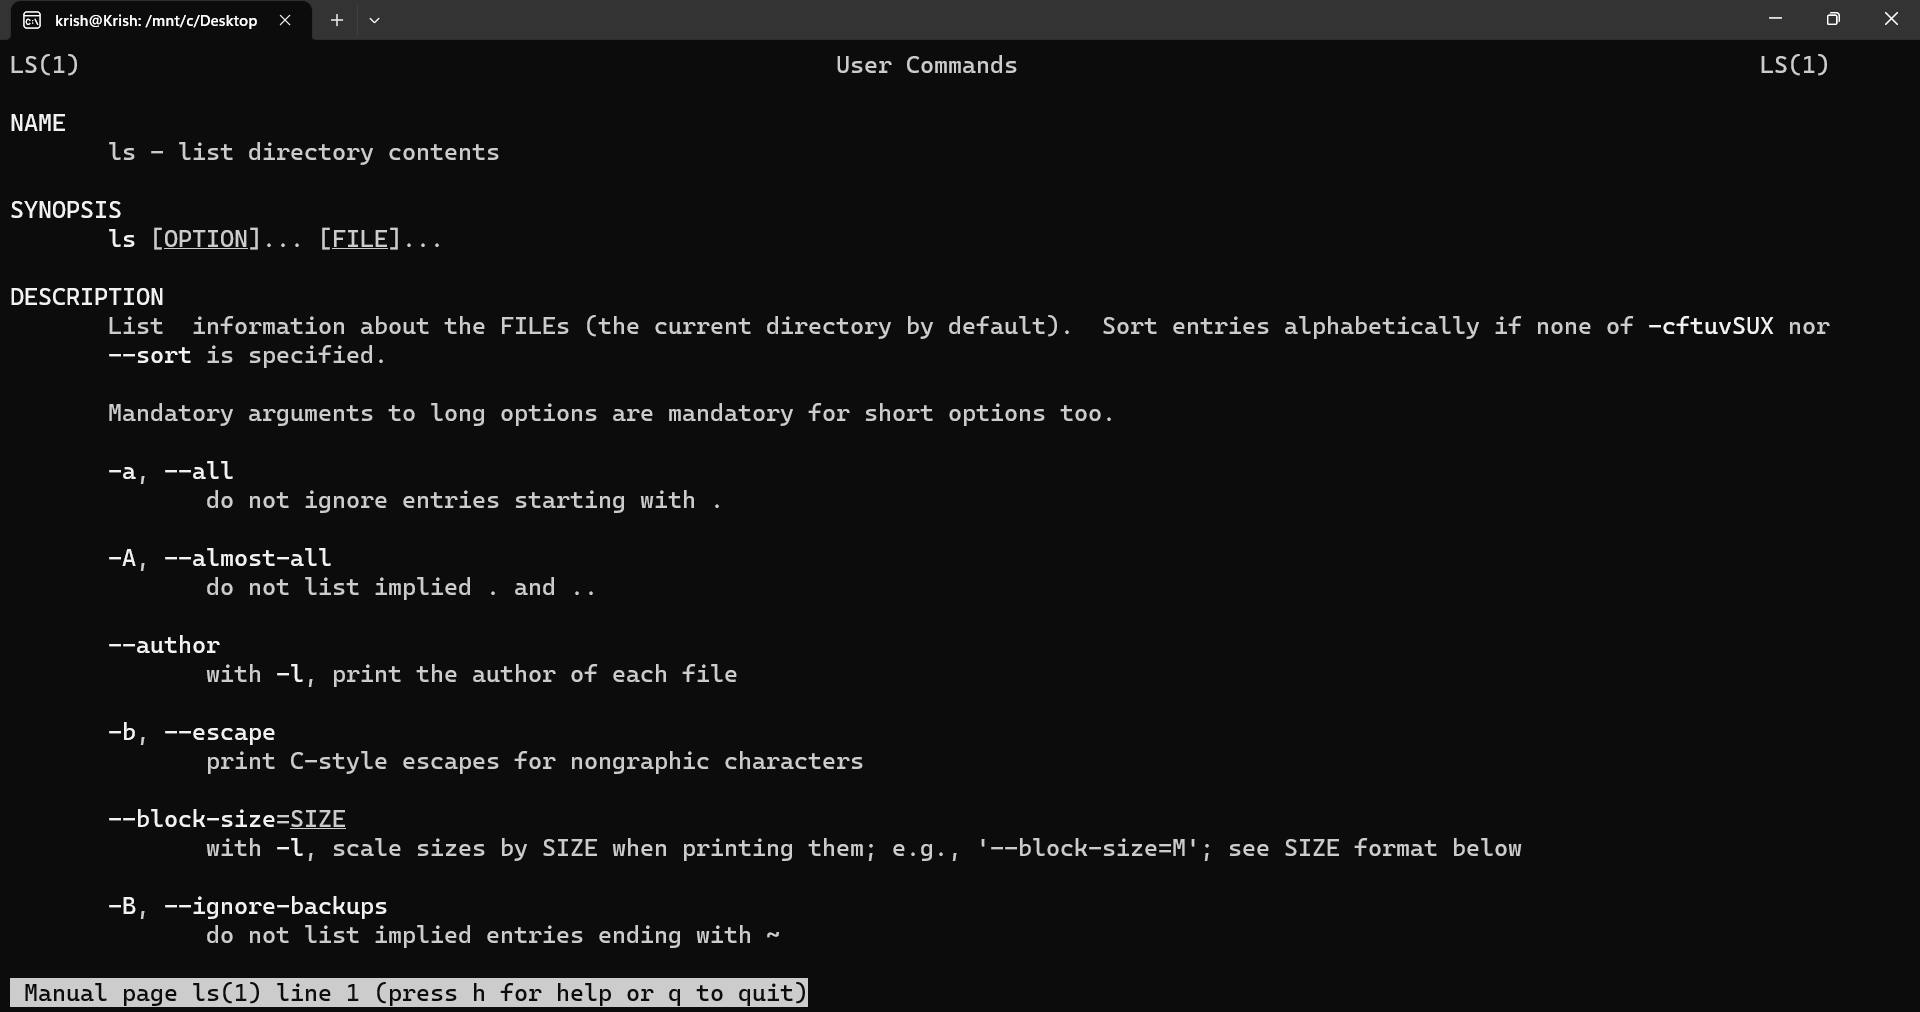
Navigate through the entire bundle of information using the Up and Down Arrow Keys. Press h for help and q for quit (exit out of the man).
There also exists a command called whatis which will give you a brief information about the command you provide to it. Say you forgot what ls command does and you want a brief info about it, type in: whatis ls:

As you saw in the above image, You can just type in whatis along with the name of the command you want to know about and whatis will provide you a brief info about that command.
Note that the
manas well as thewhatiscommand is quite helpful but sometimes you may not find the description of the command you are looking for, in that case you need to Google it up!
For example: If you search for thecdcommand usingmanor thewhatis, you will not get the expected result.
To know more about
cd, you need to Google it.

Let's also look at some important shortcuts which come quite handy while using Linux:
If you accidentally cleared the console and now you want to know what commands you had typed in the past, there are 2 methods for approaching this:
historycommand- This command displays all the commands that you have typed in/executed from the very start of the Operating System.Up arrow Key- Pressing the up arrow key on the keyboard will get you the previously typed commands in reverse order meaning pressing it once gets you the last command you entered, pressing it two times, gets you the second last command executed by you and so on.
Press Ctrl + R for a reverse search. It helps you recall the last command matching the characters you provide.
Use
Tabfor Auto Complete: Let me share a picture with you!
The above image is basically a look inside all the visible directories present inside my Desktop directory using the
lscommand.Suppose I wanted to navigate to
TestFolder, I can do it by typing cd TestFolder. But it does not make sense to me to type the entire name again and again.
So I can just type incd Testand then pressTabkey to autocomplete it to:cd TestFolderfor me!
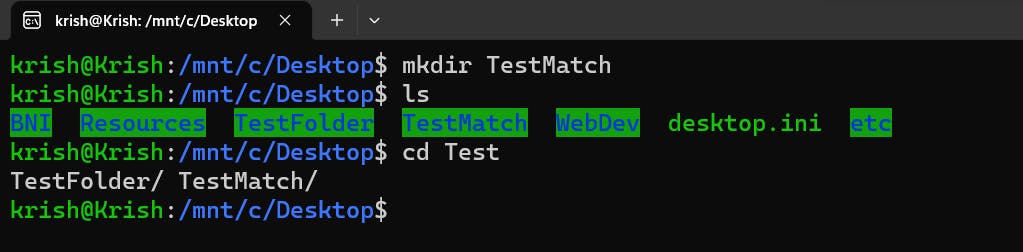
Now you might question, If we had 2 directories starting with the name - Test say TestFolder and TestMatch, in that case, when you type Test, nothing happens!
But in such a case with files and directories of same name, when we press Tab twice, it displays those directories with the same name. See the below image for understanding this:
There are other shortcuts as well which you can read in the article mentioned below by RedHat!
Conclusion and Resources
If you have read till here, I would first like to say a big Thank You for staying till the end. I hope you enjoyed reading this blog and was worth your time!
A brief introduction about myself: I am Krish, A Highschooler who is currently learning web development and trying to share my learnings in public through Twitter threads and Blogs on Hashnode. I am currently learning React and building some projects around it. This is my Twitter Handle, Do connect with me there, DM's are always open! Twitter: @Krish4856
Also check out my latest Thread on Error Handling In React!
I have just started learning Linux through the Linux Master Class Bootcamp by Apoorv Goyal on YouTube and Linux Foundation's Introduction to Linux Course on edX. Follow the Linux In One Go Series to stay notified about the latest blogs coming out!